Tag Archives: sketch

How to Draw Smoke + Clouds + Explosions for Comics

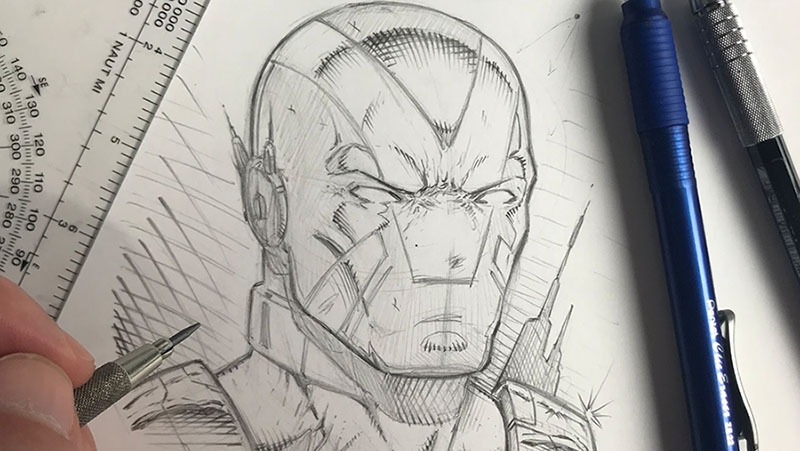
In my latest Youtube video I explain how to draw some of the basic dynamics for smoke, clouds, and explosions. These effects are widely used for comics and other forms of storytelling.

Drawing Smoke Clouds and Explosions for Comics

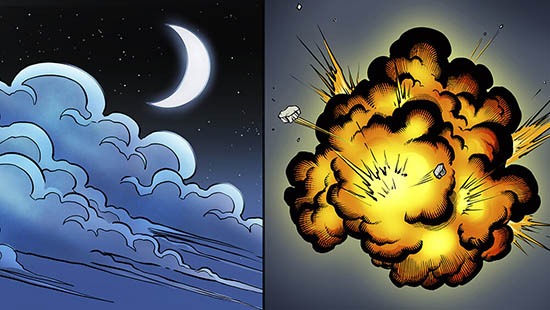
Check out the video below to see these two effects created!

Hopefully this post + video will help you get a bit better at drawing these elements within your own work. Remember if you don’t get it right the first time there is nothing to worry about. I didn’t either! Let’s jump in and start practicing.

Drawing Smoke

Let’s first start by drawing some basic smoke coming off a smoke stack. This is used in countless scenes in comics and is pretty much my favorite one to draw.

You can have this effect swirling in the background and make any city scene immediately look 10 times cooler. ( In my opinion of course! 😉

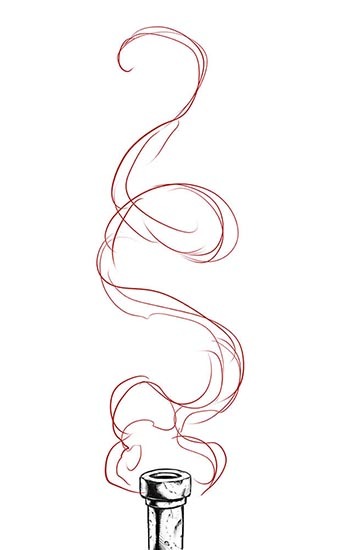
Step 1 – Start by drawing the area of influence or the basic flow of the smoke. Don’t be afraid to swirl it around a bit. I like to think about ribbons and scrolls when drawing smoke.

Drawing Smoke - Step 1
Drawing Smoke – Step 1

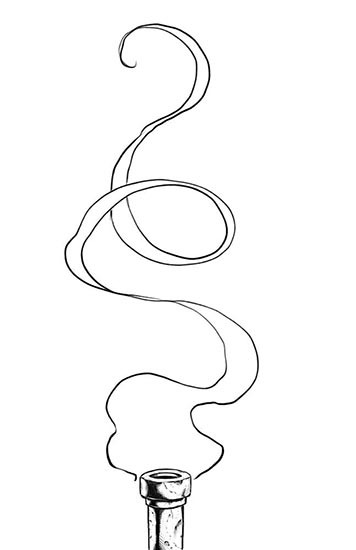
Step 2 – Erase back your construction lines or turn the opacity down on your layer. Then draw the smoke again with a bit more clarity. I like to go back and forth from thick to thin forms as the smoke rolls around. This way it looks more organic and dynamic. Use S and C curves for energy.

Drawing Smoke - Step 2
Drawing Smoke – Step 2

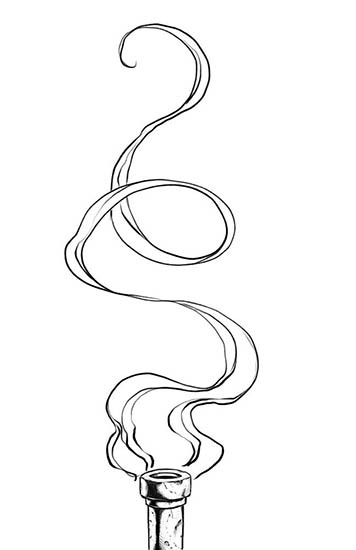
Step 3 – Draw in some of the interior lines. These can swirl around any which way you want. I like to start envisioning how the smoke might look with color at this stage. It helps me to think more dimensionally about the work as I go. You can also add in some line weight at this stage as well.

Drawing Smoke - Step 3
Drawing Smoke – Step 3

Next just ink and color it and voila! Comic book smoke! Just play with lots of variations and see what you can come up with. There is no right or wrong way with comic book smoke and art in general for that matter. If you’re having fun then your on the right track! 🙂

Watch my this Youtube video on the subject and get more tips and tricks on creating more effects.

I hope you enjoy the tutorials and more on the way soon!

Check out my Gumroad Store here for Video Course Content and Custom Brushes – http://www.gumroad.com/robertmarzullo

Let me know what other topics you would like to see covered on this blog and I will do my best to answer them with a new tutorial. I love doing break downs like this and your ideas help me to focus on what to do next.

Keep Drawing and Keep Having Fun!!

-ROB

How to draw comic style art – from sketch to rendering

How to Draw Comic Style Art – From Sketch to Rendering

Welcome back fellow comic art enthusiasts! I have completed a new series of lessons for you on drawing in a traditional comic art style. From rough sketching to the final rendering and cross hatching stage, you will learn the process I use to create my art with good old pencil and paper.

If you are looking to learn how to draw comics in a step by step fashion then this course is meant for you!

I first walk you through my basic supplies. I show you how I use a variety of pencil leads ranging from 2H to 2B to get the look I am after. This course has multiple projects files so that you can work along with me to better understand drawing with Line, Shape, Form, and Shadow. With these fundamental ideas you can draw anything around you and translate it into your imaginative work of art!

Here are some of the things you can expect to learn in this course –

  • Understanding Line – Shape and Form
  • Constructing Your Designs with Primitive Shapes
  • Working with Light and Shadow
  • Cross hatching or Rendering Techniques
  • Line Weight and Line Clarity
  • Focal Points
  • Contrast within the work
  • And Rendering a Variety of Materials
  • Drawing Dynamic Poses
  • Creating a Superhero Character Design

Get Lifetime access to these video lessons here on my Gumroad – https://gumroad.com/l/PNGi/RAMSTUDIOSCOMICS101

If you prefer to get this course on Udemy then please use this link here – https://www.udemy.com/course/how-to-draw-comic-style-art-from-sketch-to-rendering/?couponCode=RAMSTUDIOSCOMICS111

Once you have purchased this content you get all updates for free. I will be adding more lessons as I learn new techniques to share with you on drawing comic superheroes! Currently this entire course is 6 hours long.

I hope you enjoy the lessons and you can share your artwork with me here through my contact form. Good luck with your comic art and have a great day!

-Rob

Procreate Like a Pro: Create Awesome Digital Art on an iPad – Udemy

Procreate Like a Pro: Create Awesome Digital Art on an iPad

Procreate Like a Pro: Create Awesome Digital Art on an iPad

In this course you will learn about the app in two fundamental ways. You will watch me explain the interface while demonstrating the hand gestures that are used to complete various tasks. You will learn how to import and export images, flip the canvas, share the  work in various formats, export video, setup the perspective tools, and adjust the interface to your preference.

Want to Learn How to Draw on an iPad?

In the next section I will take you through a complete illustration from start to finish. This will allow you to see and work through the process of creating the illustration and commit it to memory. You will learn about the brushes, layers, blending modes, lock transparency, selection tools, color adjustments, and general tips and tricks on painting various effects with texture.

By the end of this course you will have created a fun and informative art project. I would love to see what come up with and I would be happy to give you any feedback I can. Just share the work in the Q+A Section when you are done!

Get this course here  – https://www.udemy.com/procreate-like-a-pro-create-awesome-digital-art-on-an-ipad/?couponCode=RAMSTDIOSCOMICS101

Promo Video –

Robert A. Marzullo

Ram Studios Comics

How to Improve Your Creature Design Drawing – Step by Step – Course

Creature Design Class

How to Improve Your Creature Design Drawing – Step by Step

In this course you will learn how to draw a variety of creature concepts. I will walk you through all the techniques that I use to draw imaginative creatures every day. This course is good for traditional and digital artists.

You will learn how to draw various studies to improve your knowledge and gain inspiration. We will cover break downs of specific areas in the creature anatomy to better understand how their bodies work.

You will learn to draw and study the spine since it is the foundation of almost any creature you will draw. I will walk you through creating lots of different concepts in this course.

Here is a break down of the Lessons that are currently available –

L1 – The Spine Says it All – In this lesson you will learn why studying the spine is so important and follow along with me as I illustrate a few examples.(Run Time – 13:09)

L2 – Thumbnailing the Concepts – In this lesson we will thumbnail 11 different concepts. This is an integral part of the design process. By keeping the ideas loose and the sketches quick ( 5-6 Minutes ) you can express a lot of concepts to work from. (Run Time – 8:54)

L3 – The Brain Box – In this lesson you will learn how to draw various heads for our creatures. We will talk about some of the differences that define predators and prey. (Run Time – 9:19)

L4 – Creating Variations in Your Concepts – In this lesson we will draw 6 creature designs but focus on making each one very different from the previous example. This can be a great way to stretch the imagination. (Run Time – 12:00)

L5 – Animal Leg Studies – It is important to study various parts of animal anatomy to gain perspective on your creature designs. Here we will draw 3 examples from animals and adjust them slightly to look more imaginative. (Run Time – 7:57)

L6 – Merging Concepts Together – In this lesson you will work with me as I draw 6 different creature limbs. Each will have at least 2 various traits mixed together to create the design. (Run Time – 11:04)

L7 – Adjusting Proportions – In this lesson you will learn how to create a creature concept and then adjust the proportions to make a very different version of that same creature. This can be another very useful exercise in developing a unique creature design. (Run Time – 11:03)

L8 – Project Ogre Thumbnails – In this lesson you will learn how to work from a script like a real pro does. This is a fun and important exercise to do so let’s get to it. We will start by drawing out our thumbnails to this concept. (Run Time – 17:02)

L9 – Cleaning up the Concept – In this lesson we will draw one more thumbnail and make our decision on what to keep and what to pitch. We will then start to clean up our sketch. (Run Time – 17:08)

L10 – Refining the Drawing – Now the heavy lifting has been done and we will start to refine the line work and make it pretty for the client or our portfolio…or both! (Run Time – 18:50)

More lessons are on the way and I am here if you have any questions or feedback for me. You also get access to all of these art files to study from.

Get Lifetime Access to this Course here – https://ram-studios-comics-art-school.teachable.com/p/how-to-improve-your-creature-design-drawings-step-by-step

Get a glimpse into this course here on my Youtube channel – https://youtu.be/FVDKCH8IwP4

Robert A. Marzullo                                                                                                      Ram Studios Comics

Learn to Draw and Paint an Ogre Concept in Manga Studio 5 / Clip Studio Paint

Learn to Draw and Paint an Ogre Concept in Manga Studio 5 / Clip Studio Paint

___________________________________________________________________________

Welcome back everyone! I have some new course content to share with you today. It is on drawing and painting an Ogre character concept in Manga Studio 5 / Clip Studio Paint. In this course I will walk you through the entire process step by step while explaining the tools I use within this program.

Ogre Concept Art Sketch by RAM

Drawing and Refining the Concept

We will first start with the rough sketch where you will learn how to define the overall proportions of this creature design. You will learn a series of techniques to adjust and add to the existing line work to get the desired look of the character. Then I will show you how to clean up the line work and get it ready for the digital painting process.

Ogre Concept Art Flats by RAM

Adding in the Flats and Separating the Work

In the next lessons we will go over how to add in the flat colors while segmenting the work. This will help us visualize the direction we are heading and aid in the painting process later on. Segmenting the work on complex characters or scenes can help you to retain a solid feel to the artwork until you build the confidence to no longer need these steps. Some artists use this method on every piece of artwork they create and others begin to use less and less layers over time as their skills with editing become more effective.  It is for you to decide what works best in your workflow.

Ogre Concept Art Painted by RAM

After we have put all the foundational information in place we will begin to add in our digital painting effects. We will be using some custom brushes but not many. I have puposely created this artwork with a minimal set of brushes to show you that it can be done effectively with just a few good brushes. Amazing paintings can be done with just one brush but you will spend more time creating the effects you might be looking for. All the brushes I have used will be included with this course.

___________________________________________________________________________

This course consists of 19 step by step narrated lessons showing you how to draw and paint this character design. You get the art files and custom brushes to work along with. The total course is

4 Hours 29 Minutes long.

___________________________________________________________________________

So I am excited to know what you think and if you decide to take this course I hope you gain a lot of valuable techniques for your workflow. I am here if you have any questions!

You can get this entire Course on my Gumroad here – https://gum.co/lYFX

Robert A. Marzullo

Ram Studios Comics