Notice: Function _load_textdomain_just_in_time was called incorrectly. Translation loading for the simple-lightbox domain was triggered too early. This is usually an indicator for some code in the plugin or theme running too early. Translations should be loaded at the init action or later. Please see Debugging in WordPress for more information. (This message was added in version 6.7.0.) in /home2/h0a3d1p3/staging.ramstudioscomics.com/wp-includes/functions.php on line 6131
Deprecated: Creation of dynamic property WP_Rocket\Engine\Preload\SitemapPreloadSubscriber::$options is deprecated in /home2/h0a3d1p3/staging.ramstudioscomics.com/wp-content/plugins/wp-rocket/inc/Engine/Preload/SitemapPreloadSubscriber.php on line 26
Deprecated: Creation of dynamic property WP_Rocket\Engine\Preload\SitemapPreloadSubscriber::$sitemap_preload is deprecated in /home2/h0a3d1p3/staging.ramstudioscomics.com/wp-content/plugins/wp-rocket/inc/Engine/Preload/SitemapPreloadSubscriber.php on line 27
Notice: Function _load_textdomain_just_in_time was called incorrectly. Translation loading for the rocket domain was triggered too early. This is usually an indicator for some code in the plugin or theme running too early. Translations should be loaded at the init action or later. Please see Debugging in WordPress for more information. (This message was added in version 6.7.0.) in /home2/h0a3d1p3/staging.ramstudioscomics.com/wp-includes/functions.php on line 6131
Deprecated: Automatic conversion of false to array is deprecated in /home2/h0a3d1p3/staging.ramstudioscomics.com/wp-content/plugins/wp-rocket/inc/3rd-party/plugins/seo/yoast-seo.php on line 10
Deprecated: Use of "parent" in callables is deprecated in /home2/h0a3d1p3/staging.ramstudioscomics.com/wp-content/plugins/simple-lightbox/includes/class.options.php on line 501
Deprecated: Using ${var} in strings is deprecated, use {$var} instead in /home2/h0a3d1p3/staging.ramstudioscomics.com/wp-content/plugins/simple-lightbox/includes/class.field_type.php on line 435
Deprecated: Use of "parent" in callables is deprecated in /home2/h0a3d1p3/staging.ramstudioscomics.com/wp-content/plugins/simple-lightbox/includes/class.options.php on line 501
Deprecated: Use of "parent" in callables is deprecated in /home2/h0a3d1p3/staging.ramstudioscomics.com/wp-content/plugins/simple-lightbox/includes/class.options.php on line 501
Deprecated: Use of "parent" in callables is deprecated in /home2/h0a3d1p3/staging.ramstudioscomics.com/wp-content/plugins/simple-lightbox/includes/class.options.php on line 501
Deprecated: Use of "parent" in callables is deprecated in /home2/h0a3d1p3/staging.ramstudioscomics.com/wp-content/plugins/simple-lightbox/includes/class.options.php on line 501
Deprecated: Use of "parent" in callables is deprecated in /home2/h0a3d1p3/staging.ramstudioscomics.com/wp-content/plugins/simple-lightbox/includes/class.options.php on line 501
Deprecated: Use of "parent" in callables is deprecated in /home2/h0a3d1p3/staging.ramstudioscomics.com/wp-content/plugins/simple-lightbox/includes/class.options.php on line 501
Deprecated: Use of "parent" in callables is deprecated in /home2/h0a3d1p3/staging.ramstudioscomics.com/wp-content/plugins/simple-lightbox/includes/class.options.php on line 501
Deprecated: Use of "parent" in callables is deprecated in /home2/h0a3d1p3/staging.ramstudioscomics.com/wp-content/plugins/simple-lightbox/includes/class.options.php on line 501
Deprecated: Use of "parent" in callables is deprecated in /home2/h0a3d1p3/staging.ramstudioscomics.com/wp-content/plugins/simple-lightbox/includes/class.options.php on line 501
Deprecated: Use of "parent" in callables is deprecated in /home2/h0a3d1p3/staging.ramstudioscomics.com/wp-content/plugins/simple-lightbox/includes/class.options.php on line 501
Deprecated: Use of "parent" in callables is deprecated in /home2/h0a3d1p3/staging.ramstudioscomics.com/wp-content/plugins/simple-lightbox/includes/class.options.php on line 501
Deprecated: Use of "parent" in callables is deprecated in /home2/h0a3d1p3/staging.ramstudioscomics.com/wp-content/plugins/simple-lightbox/includes/class.options.php on line 501
Deprecated: Use of "parent" in callables is deprecated in /home2/h0a3d1p3/staging.ramstudioscomics.com/wp-content/plugins/simple-lightbox/includes/class.options.php on line 501
Deprecated: Use of "parent" in callables is deprecated in /home2/h0a3d1p3/staging.ramstudioscomics.com/wp-content/plugins/simple-lightbox/includes/class.options.php on line 501
Deprecated: Use of "parent" in callables is deprecated in /home2/h0a3d1p3/staging.ramstudioscomics.com/wp-content/plugins/simple-lightbox/includes/class.options.php on line 501
Deprecated: Use of "parent" in callables is deprecated in /home2/h0a3d1p3/staging.ramstudioscomics.com/wp-content/plugins/simple-lightbox/includes/class.options.php on line 501
Deprecated: Use of "parent" in callables is deprecated in /home2/h0a3d1p3/staging.ramstudioscomics.com/wp-content/plugins/simple-lightbox/includes/class.options.php on line 501
Deprecated: Use of "parent" in callables is deprecated in /home2/h0a3d1p3/staging.ramstudioscomics.com/wp-content/plugins/simple-lightbox/includes/class.options.php on line 501
Deprecated: Use of "parent" in callables is deprecated in /home2/h0a3d1p3/staging.ramstudioscomics.com/wp-content/plugins/simple-lightbox/includes/class.options.php on line 501
Deprecated: Use of "parent" in callables is deprecated in /home2/h0a3d1p3/staging.ramstudioscomics.com/wp-content/plugins/simple-lightbox/includes/class.options.php on line 501
Deprecated: Use of "parent" in callables is deprecated in /home2/h0a3d1p3/staging.ramstudioscomics.com/wp-content/plugins/simple-lightbox/includes/class.options.php on line 501
Deprecated: Use of "parent" in callables is deprecated in /home2/h0a3d1p3/staging.ramstudioscomics.com/wp-content/plugins/simple-lightbox/includes/class.options.php on line 501
Deprecated: Use of "parent" in callables is deprecated in /home2/h0a3d1p3/staging.ramstudioscomics.com/wp-content/plugins/simple-lightbox/includes/class.options.php on line 501
Deprecated: Use of "parent" in callables is deprecated in /home2/h0a3d1p3/staging.ramstudioscomics.com/wp-content/plugins/simple-lightbox/includes/class.options.php on line 501
Deprecated: Use of "parent" in callables is deprecated in /home2/h0a3d1p3/staging.ramstudioscomics.com/wp-content/plugins/simple-lightbox/includes/class.options.php on line 501
Deprecated: Use of "parent" in callables is deprecated in /home2/h0a3d1p3/staging.ramstudioscomics.com/wp-content/plugins/simple-lightbox/includes/class.options.php on line 501 line art Archives - Ram Studios Comics
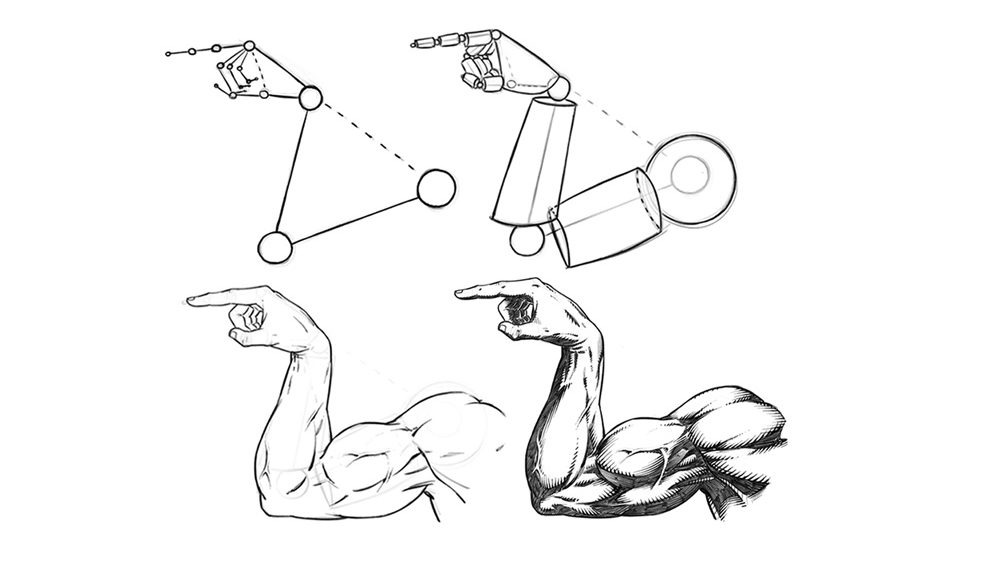
In this tutorial we will be drawing the outside of a male muscular arm. This time it’s the old, “Which Way to the Beach” pose. We have all done it one time or another, right? Let’s get to it!
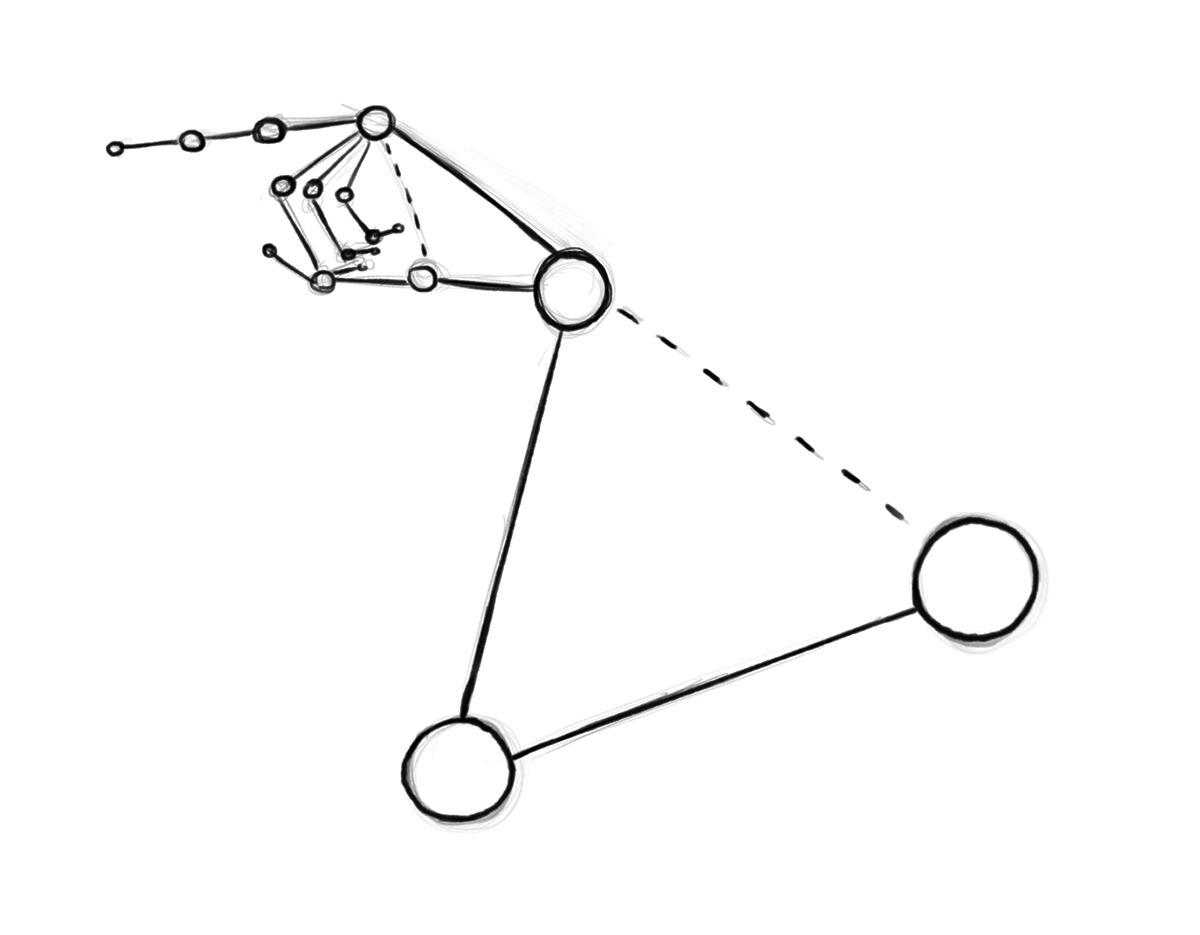
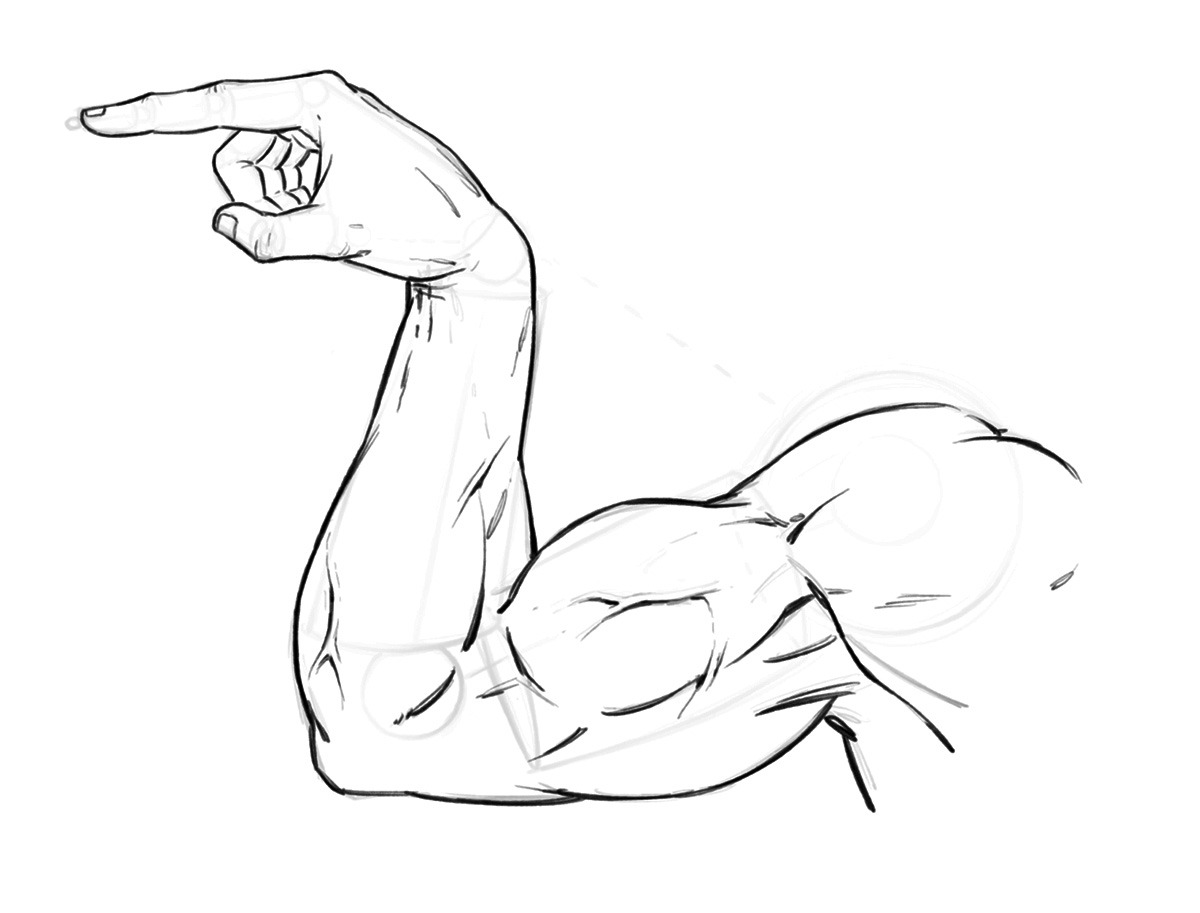
Step 1 – Draw out the direction of the pose with the line and circle method. Think of these like the bones under the muscles and at this stage just focus on the length and direction of each section of the arm and hand. Notice the relationship from the wrist to the shoulder and the shape of the base of the hand from this angle.
They are both triangular. It helps to notice shapes like these to make your drawings more consistent.
Drawing an Arm Pose – Step 1 – Arm Structure
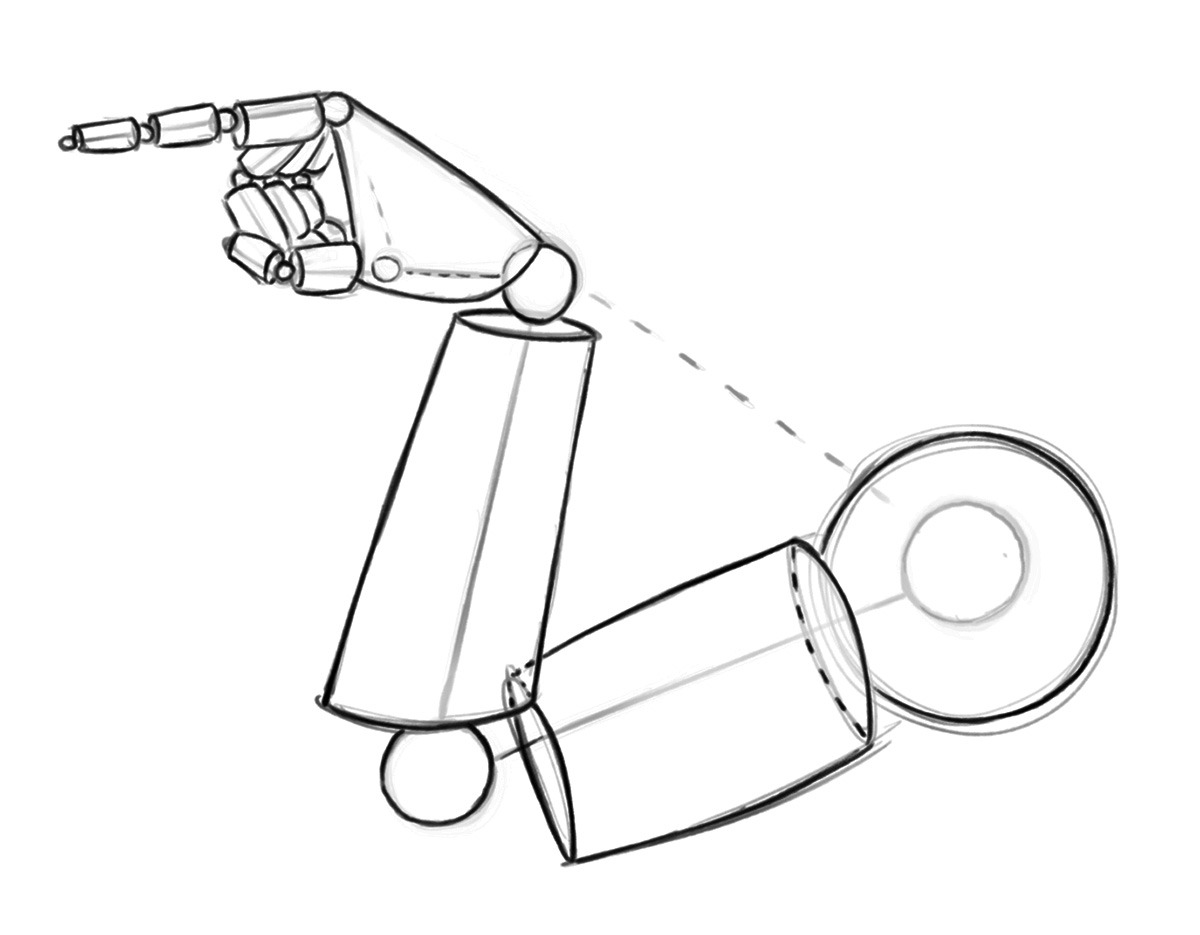
Step 2 – Now draw out the cylinder shapes to establish the basic forms. Think of a mannequin or marionette. Keep it simple and still only think about proportions and direction of the segments. Also be open to changes at any stage of this process. Correcting things early on will save you lots of time and heartache.
Drawing an Arm Pose – Step 2 – Basic Forms
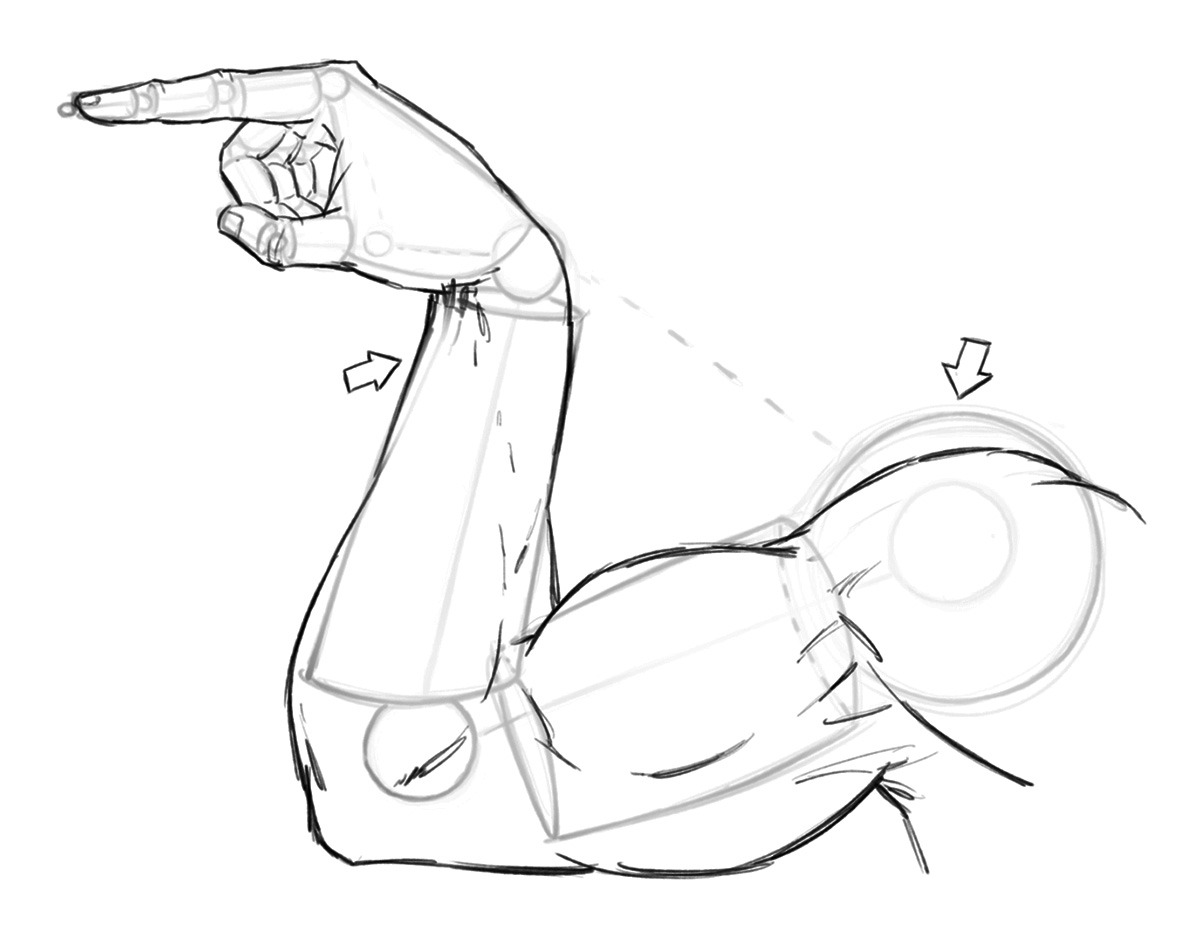
Step 3 – Now soft erase your lines and start to draw more curvature for your anatomy. Notice the way that each area tapers inward to meet the next. The shoulder tapers in to meet the upper arm and the upper arm tapers in the meet the lower arm and so forth. And notice where I changed the shape of the anatomy to go inside and outside of the initial mannequin stage. The basic construction is only meant to be a guide, so I never hesitate to make changes if I see something that could be better.
Drawing an Arm Pose – Step 3 – Anatomy
Quick Tip – Study anatomy often but improve over a long period of time. Don’t let the idea of perfection slow you or stop you from completing your work!
Step 4 – Now like before, soft erase your lines and begin to refine the anatomy a bit more. This time giving more line weight and clarity to the drawing. You can also start to draw in some veins to add to the depth and realism to the drawing.
Drawing an Arm Pose – Step 4 – Refining the Line Work
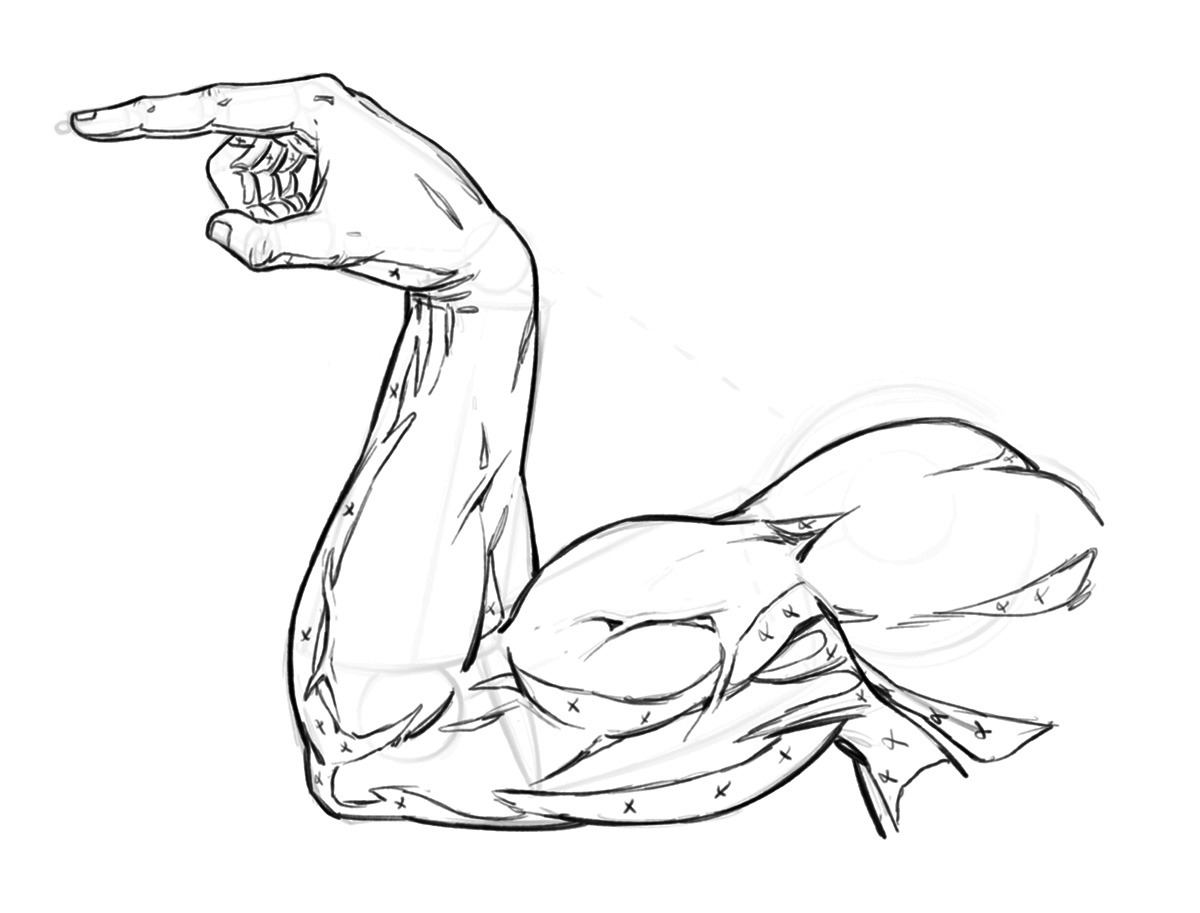
Step 5 – Draw in the shapes of shadows to your muscles. And if you are working with an inker make sure to sketch the small x’s so they can read the artwork more clearly. You don’t necessary have to do this step if you are your own inker but it doesn’t hurt to get in the habit, just in case!
Drawing an Arm Pose – Step 5 – Adding in the Shapes of Shadows
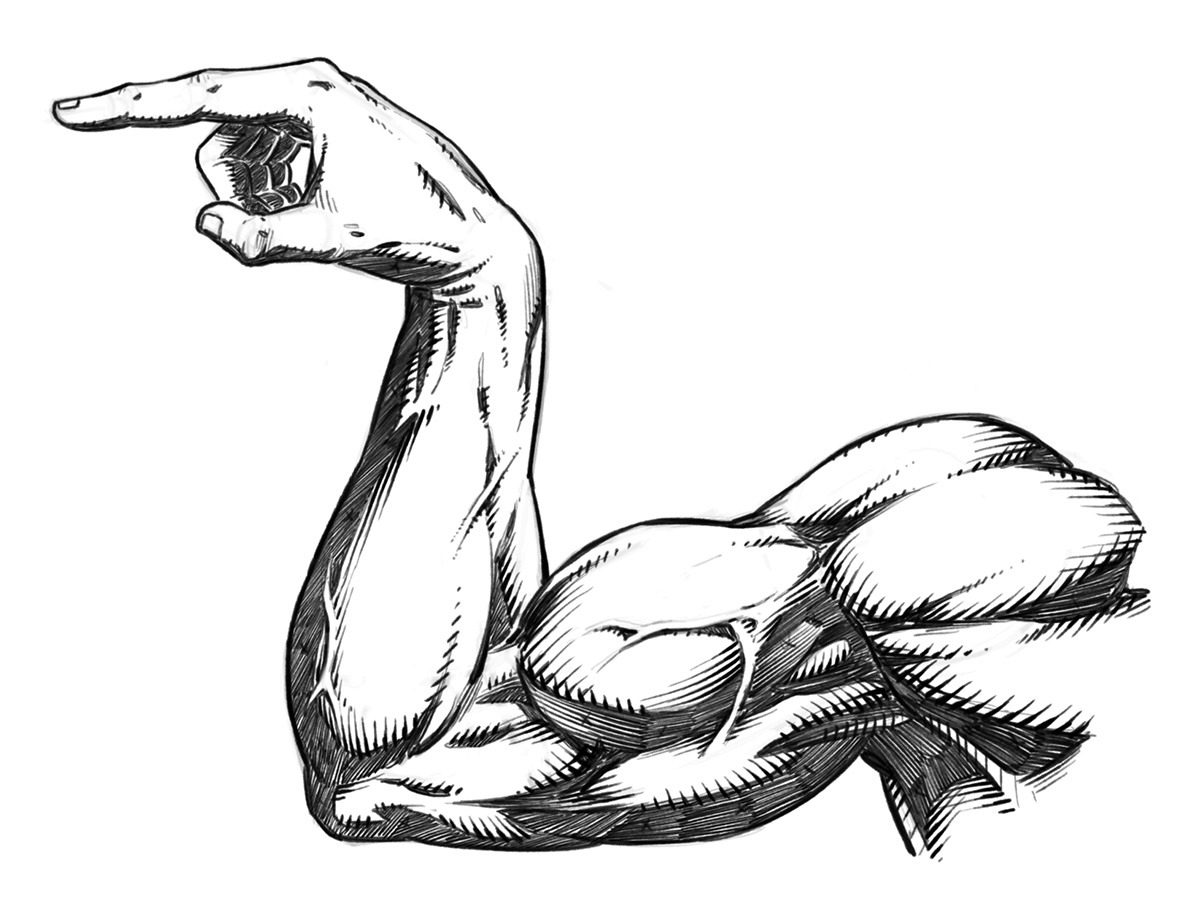
Step 6 – Now add in your rendering lines and really start to make the artwork pop off the page. Notice how the veins cast a small shadow of their own on one side. And, how they catch light on them even in the shadow of the arm. This is more stylized but it gives the appearance of depth. Overall this is a very stylized arm drawing but that is the fun of comics, not everything has to be entirely accurate!
Drawing an Arm Pose – Step 6 – Rendering and Cross Hatching
I hope you’ve enjoy this quick tutorial on stylized arm anatomy for comics. This is a sample tutorial from my book “Learn to Draw Action Heroes” which you can find on Amazonor at Barnes and Nobel.
How to Ink Various Textures and Effects with Traditional Art Tools
I just created a new class on Traditional Inking Techniques. You can get it on my Gumroad or watch it on Skillshare with the links below.
In this class I will show you my methods for drawing and inking various textures with traditional tools. You will learn about line weight, textures, cross hatching, and making corrections as you work.
This class currently include 3 project files and the run time is at just over an hour. The first project is drawing and inking a monstrous face. Here we will go over the benefits or random textures and effects. Sometimes you just have to let the pen go and see what happens!
For the next project you will draw and ink a fantasy art sword. This will allow us to work on something with more structure and talk about clean lines. This is also a good opportunity to render some chrome like effects.
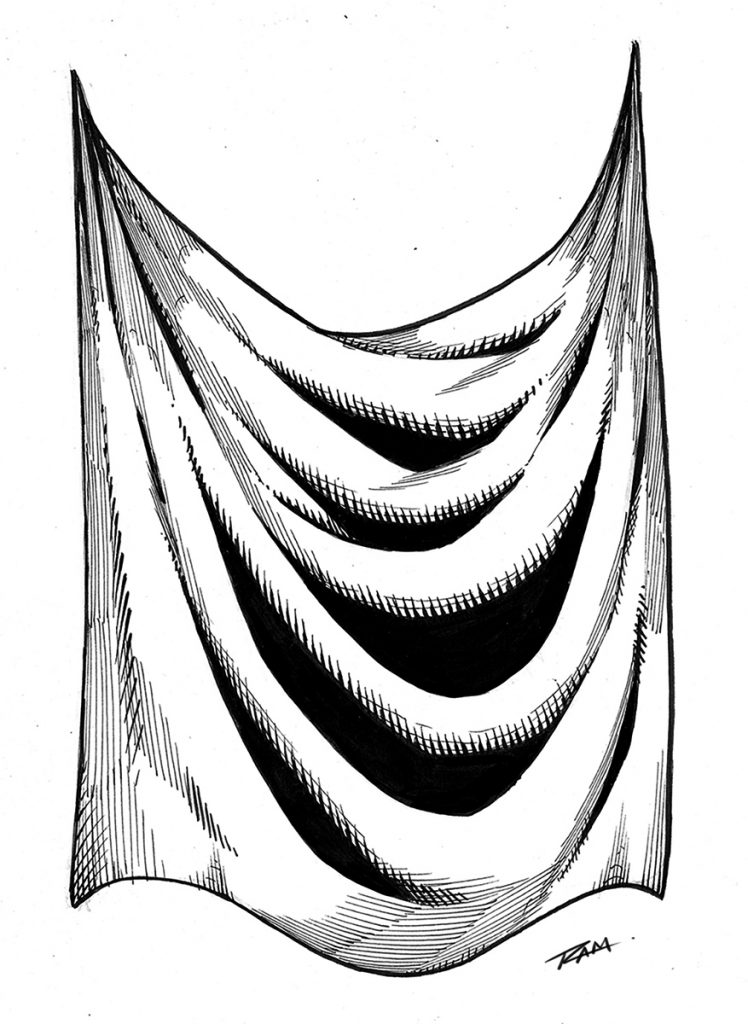
For the third project we will draw and ink some drapery. This is something we need to practice a lot and it will relate to clothing and a variety of other materials. This one is a time lapse with narrated since many of the concepts will be redundant.
You get all the art files to study and work along with. I will be adding more examples very soon but let me know if there is something you would like to see covered in future lessons.
Tools that we will be using in this class –
Strathmore 200 Series Bristol Board Smooth
Micron Pens – 01, 05
Tombow Dual Brush Pen – N15
Zebra Pen WFSS4 150
Presto Jumbo Correction Pen ( White Out )
Pentel Brush Pen Fine Point
Staedtler 2mm Lead Holder – 2H lead
Thank you for your continued support and good luck with your studies!
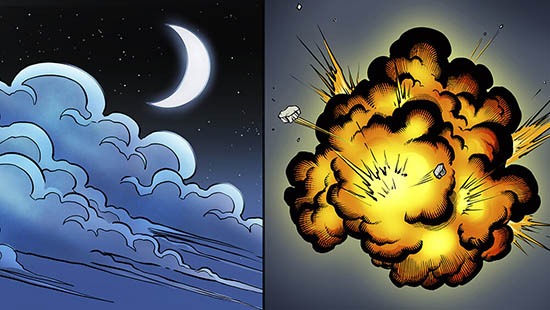
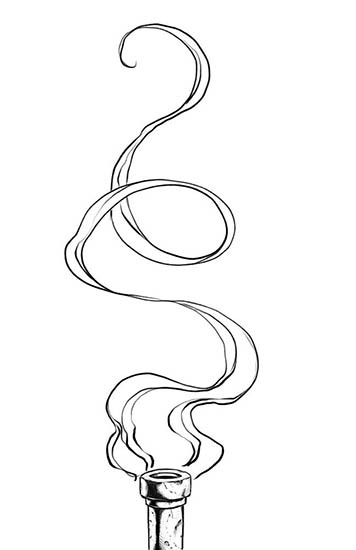
In my latest Youtube video I explain how to draw some of the basic dynamics for smoke, clouds, and explosions. These effects are widely used for comics and other forms of storytelling.
Drawing Smoke Clouds and Explosions for Comics
Check out the video below to see these two effects created!
Hopefully this post + video will help you get a bit better at drawing these elements within your own work. Remember if you don’t get it right the first time there is nothing to worry about. I didn’t either! Let’s jump in and start practicing.
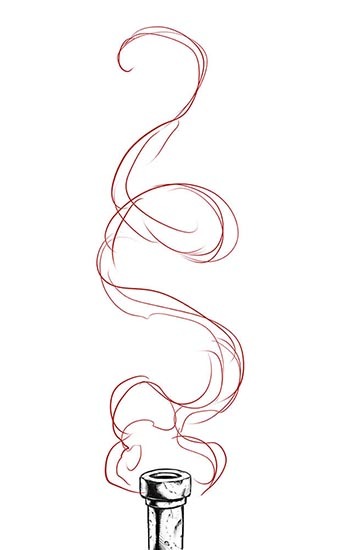
Drawing Smoke
Let’s first start by drawing some basic smoke coming off a smoke stack. This is used in countless scenes in comics and is pretty much my favorite one to draw.
You can have this effect swirling in the background and make any city scene immediately look 10 times cooler. ( In my opinion of course! 😉
Step 1 – Start by drawing the area of influence or the basic flow of the smoke. Don’t be afraid to swirl it around a bit. I like to think about ribbons and scrolls when drawing smoke.
Drawing Smoke – Step 1
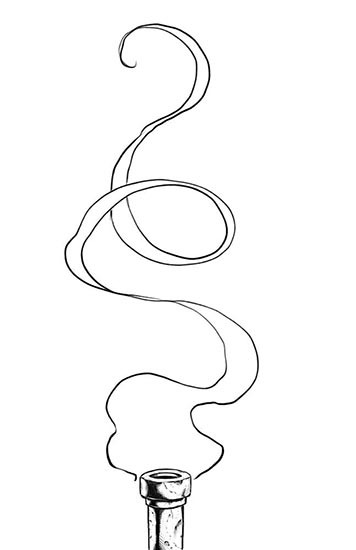
Step 2 – Erase back your construction lines or turn the opacity down on your layer. Then draw the smoke again with a bit more clarity. I like to go back and forth from thick to thin forms as the smoke rolls around. This way it looks more organic and dynamic. Use S and C curves for energy.
Drawing Smoke – Step 2
Step 3 – Draw in some of the interior lines. These can swirl around any which way you want. I like to start envisioning how the smoke might look with color at this stage. It helps me to think more dimensionally about the work as I go. You can also add in some line weight at this stage as well.
Drawing Smoke – Step 3
Next just ink and color it and voila! Comic book smoke! Just play with lots of variations and see what you can come up with. There is no right or wrong way with comic book smoke and art in general for that matter. If you’re having fun then your on the right track! 🙂
Watch my this Youtube video on the subject and get more tips and tricks on creating more effects.
I hope you enjoy the tutorials and more on the way soon!
Let me know what other topics you would like to see covered on this blog and I will do my best to answer them with a new tutorial. I love doing break downs like this and your ideas help me to focus on what to do next.
Ever wonder what steps you should take to improve your comic style art?
I always get this question, “How can I improve my comic art?” I will admit the most common answer you will ever hear in your life is Practice! It’s is the answer that no student wants to hear. I remember hearing it and thinking, “I practice like a madman already. How much does it take?”
Instead of giving you the lazy answer, let’s delve into the details a bit more. It isn’t enough to know that you need to practice a lot. You need to know what to practice and why. You also need a few other concepts to think about. Strangely enough, it’s not all about practice. Let’s jump on in!
Practice Poses as Often as Possible!
TIP#1 Practice Daily!
Wait! You just said?! I know, it seems like a low blow doesn’t it? It really is the first and easiest answer. You have to practice daily to improve. Long gaps will hurt your development.
What should you practice is probably the best question but you have to answer that one for yourself. Find the weakest link in your chain and make it the strongest. If you can’t draw faces but you draw really great muscles then you know what you need to do. It is hard to do because we gravitate to what we are confident at.
So fight the habit and dedicate a good portion of your studies to what matters most or something that is holding your work back from being amazing.
TIP#2Create Finished Art!
You need to create finished pieces of comic art or you are setting yourself up for potential failure. Sketching and studies are extremely important of course but if you don’t focus on completing your work you won’t develop a strong portfolio and ultimately won’t secure any work.
People don’t commission or hire based upon sketches. Finishing your art pieces will also force you to deal with the fact you may not be able to draw feet, hands, or faces. It is easy to hide those things in rough sketches. ( Maybe not the faces. )
Completing your work will also make you fully aware of how fast or slow you can draw. Extremely important if you hope to work as a professional artist.
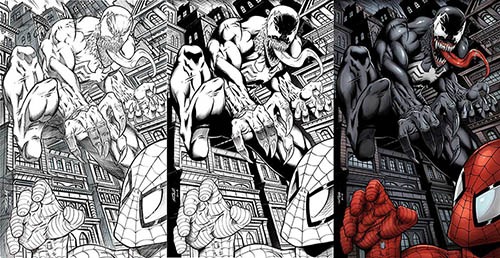
Venom and Spider-man – Stages of the Artwork
TIP#3 Ask for Constructive Criticism!
The reason I say to ask for it is I feel that if you request it, you are far more likely to receive it as sound advice. We have all gotten someone’s unwanted criticism at times and just decided to not accept it. Truth be told, it only hurts you to keep a closed mind to it.
Even someone that is a complete stranger draws like a 5 year old and has a profile pic of road kill could still be a fantastic art critic with sound advice. It’s not always going to come from someone you admire and it is more about how you choose to use the information.
When you jump into the professional world anyone and everyone can quickly become your critic and even your boss. Best to get used to it now and stomach your sensitive little ego!
TIP#4 Get Back to the Basics!
We sometimes get to a certain level in our art and we think we are the next Jim Lee or Todd McFarlane so we go for more advanced drawings. Hoping to hide any flaws in our work by applying our fancy smancy rendering techniques. It’s okay to practice this once and a while to develop our “Eye Candy” effects. Just don’t do it every time and think that no one can tell that your characters are stiff as cardboard cutouts or that your page compositions are as interesting as peeling potatoes on a Saturday night.
Getting back to the basics of drawing gestures, primitive shapes, understanding perspective, composition, understanding your tools, jumping back into your art books, and so on is often overlooked because we think we are better than we actually are. It is easy to get caught up in all the “likes” on social media from people that want to be supportive of our work or just get a bit of tunnel vision.
We have to remember that our polished art needs a sound foundation to rely upon. Only then can it soar to the heights of Mount Olympus or whatever fantasy reference you prefer.
TIP#5 Keep an Actual Sketchbook!
I really wish I would have done this more consistently through my younger years. I have tons of sketches on loose pieces of paper and although I love sifting through those fond memories a lot of them aren’t dated.
A series of completed sketchbooks gives you a more somewhat linear view of what you have accomplished. You still need to be adamant about dating your work of course. Sketchbooks are much more organized and as artists we need all the help we can get in that area. ( Well, I do at least! : /)
Sketchbooks are Very Important to Track Your Progress!
TIP#6. Go to the Comic Conventions!
This is so important if you truly want to be a professional comic book artist. The comic conventions are an amazing way to learn and grow as an artist. Even if you don’t like spending money to have a table, it is still a great experience to attend and show your work around.
This part ties into the constructive criticism from Tip #3. Showing your comic art and starting some dialogue with others about it, will teach you a lot. Just be receptive and leave your ego at home. You can’t fill a cup that is already full, right?
Also, the conventions give you a “behind the scenes” look at what works and what doesn’t. Speak to as many artists, writers, and editors as you can. The nuggets of advice you will learn from them is priceless!
TIP#7 Update your Portfolio Often!
As you complete new works of art, update your portfolio. Don’t just add to it either. Your better works should incline you to show the lesser works to the nearest exit. Your portfolio should only have room for your best comic art.
Don’t make the mistake of showing an editor a stack of sketches mixed with a few covers. It should contain 10 to 15 of your best pieces of art. It should also reflect what you want to be as a comic artist. If you want to draw books, then you need sequential storytelling not a bunch of pinups.
Also, if you do show this work to an editor, don’t make excuses on why it isn’t your best work. Only show your best work and listen more than you talk. Becoming defensive shows weakness. Just take notes and go back to the drawing board and make improvements.
In my opinion, you should also make sure to include a nice range of your abilities within those pages. Draw people with expressions and emotions as well as super-powered heroes punching through walls. Make good use of perspective and include lots of props like cars, street signs, a damaged fire escape, and so on. It shows that you can draw lots of little details and enrich the scene. If you can illustrate a scene with lots of clutter and make it read well visually then you have an edge on a lot of artists. Don’t be they guy or gal that draws superheroes against a blank white canvas all the time!
TIP#8 Draw with a Focus!
It’s not good enough to just draw. You have to have a focus. This sort of ties into Tip #1. You have to go into your drawings with a purpose.
Are you going to draw an amazing piece of fan art to show the world what you can do with their favorite character? Are you developing your studies of anatomy and poses for the next few hours? Are you going to strengthen your understanding of “Dynamic Light and Shade” with the Amazing Burne Hogarth Book you picked up? Get it here with my Amazon Link – https://amzn.to/2YsP0yO ( I highly recommend all of his books! ) Are you going to enhance your speed by doing timed studies of areas within your work?
Having an intention and focus is much more powerful than simply drawing whatever pops into your melon. It allows you to maximize your efforts. You will learn much faster by doing this and not get burned out so quickly by spending time on the wrong aspects of your work.
TIP#9 Sell your work!
You may think that this is only reserved for the pros. So not true! I started my art business in high school. I would barter my amazing ( unrefined ) art skills for good grades and social status. We all know good grades may eventually help you pay the bills but you might say, “You can’t pay your bills with social status.” Maybe not directly but it will translate to income over time.
It’s basically branding and self-promotion. Becoming the guy or girl known for being an amazing artist will get you the word of mouth that sells the work. So why all the enfasis on selling your work. It teaches you a lot about how the real world process will work.
Being able to take instructions from a client, negotiate a deal that is mutually beneficial, make changes as needed, communicate clearly, tame your ego, and deliver your artwork on a deadline. This Tip will probably teach you the most about yourself and if you can’t do this for regular joe’s then you may not be ready for the big leagues.
TIP#10 Use Reference and Draw from Life
Just because we are comic artists doesn’t mean we can’t use reference. In fact, it is quite the opposite.
Reference can take a decent artist and turn them into something amazing. I am all for drawing from imagination as much as possible but sometimes you just have to feed the brain box. Draw from life and interpret it into your own style. Then your comic storytelling will know no bounds.
Your fans will love seeing all those references ran through your creative filter. Just don’t trace or else you will weaken your ability to convert things into your own style or make changes as quickly.
TIP#11 Study from the Masters
Masters can be anyone that you admire really. They don’t all have to be Leonardo Davinci for you to learn from them. Knowledge hides in the most inconspicuous places.
Make sure to study the work but not copy it or pass it off as your own vision. If you adhere to the original work you need to credit the artist. That being said, it is actually a fantastic way to level up your art skills. It allows you to peer through their eyes and follow the choices that they made.
As a comic artist I often ink the work of others that I am inspired by. Not because I want to be an inker but because I learn immensely every time I do it. Their lines are amazing to me for a reason, so inking their work can demystify some of the process. Plus, it’s just plain fun to do! 😉
These are just some of the things I do to improve my comic art on a daily basis. I hope you find these tips to be valuable and I would love to know what are the ways your improve your art! Comment below and feel free to share the post if you enjoyed it!
Sincerely,
Robert A. Marzullo
Ram Studios Comics
Want to learn more about my comic art process. Check out my courses below…
How to Improve Your Figure Drawing – Step by Step –
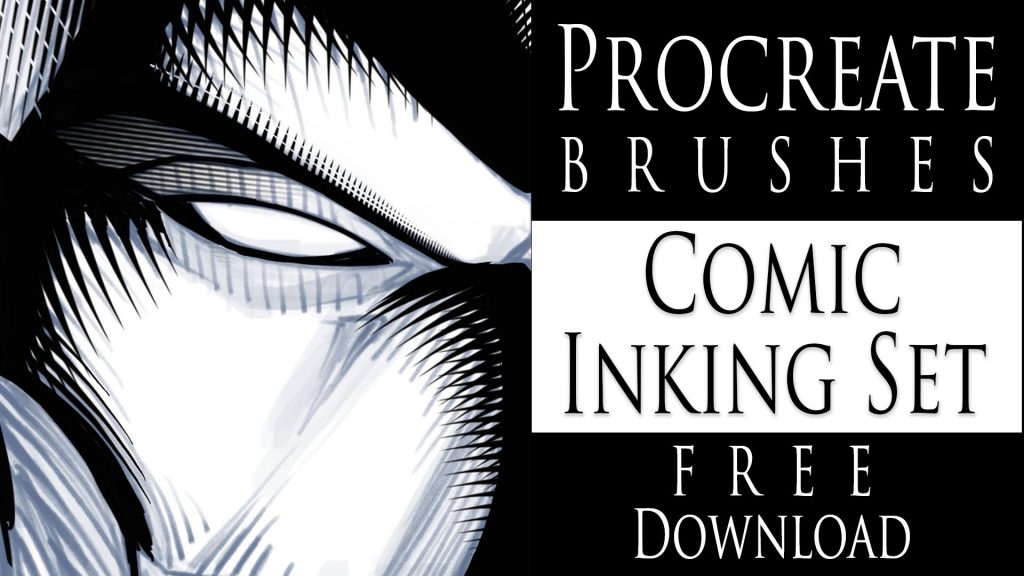
I am excited to share some new brushes with you today! I have been playing around with some comic style inking brushes for the app Procreate. I was able to come up with a few cross-hatching brushes that I think you might find helpful within your work.
I’ve noticed that a lot of artists struggle to get good effects with their cross-hatching. Almost to the point where they decide not to do much of it. This is where these brushes can help. They are designed to make that part much easier to accomplish. Keep in mind this shouldn’t deter you from drawing out your own, only to aid you in getting better at the process. These brushes look much better if they are correctly mixed with hand drawn shading. They also help to save time in certain areas of the work. Deadlines have to be met at any cost, right!
I have been using Procreate for a few years now and I really enjoy the brush creation process in this app. It is easy to do and the brush settings are extremely versatile. I will be making more of these brushes to add to this pack. There are all sorts of neat things to create for comics. Background textures, brick patterns, various brush tips, and so on.
NEW PROCREATE BRUSHES ADDED TO THIS SET!
UPDATED! Just to let you know I added 16 NEW custom Procreate brushes to this set on 5-11-2021. They included some more cross hatching brushes, background texture effects, and a couple of quick clip art brushes. I have more ideas to create so be sure to check back often!
If you want these brushes head over to my Gumroad and get them here – https://gum.co/JYdba
This is a Pay What You Want item! So if you want them for FREE just type 0 during checkout and they are yours. You will also get any updates to this pack for free as well.
If you want to learn How to Create Digital Art with Procreate please check out my full course here. This is my discount code – View here
Procreate Like a Pro: Create Awesome Digital Art on an iPad
In this course, I explain all the tools and features within Procreate. You also learn my process on using this app to create my digital art everyday. I now create 90% of all my illustration work with my iPad Pro and Procreate!
Thanks for stopping by and let me know if you have any questions for me. Feel free to email me through my contact form.
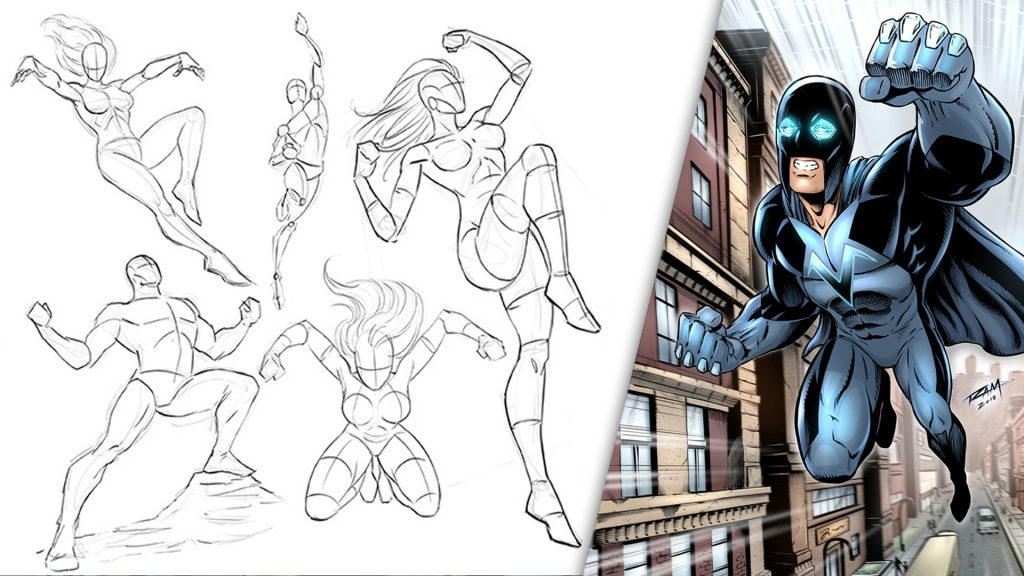
How to Draw Dynamic Superheroes – Start to Finish!
Hello Fellow Comic Artists!
I have been working on some new content to add to my existing Udemy course, How to Draw Dynamic Superheroes – Start to Finish!”
I have just included over 5 Hours of new content in this course. Putting it at over 9 Hours long with 28 NEW lessons. In this section, I show you how to draw, ink, and color a fully detailed comic book scene or cover piece. This helps to implement all of the previous lessons taught throughout the course. Which should help to commit the important parts to your memory!
Here is a breakdown of what the current curriculum looks like :
Section 1 – Basic Proportions of the Superhero Male
Section 2 – The Superhero Female
Section 3 – Drawing the Muscle Bound Brutes
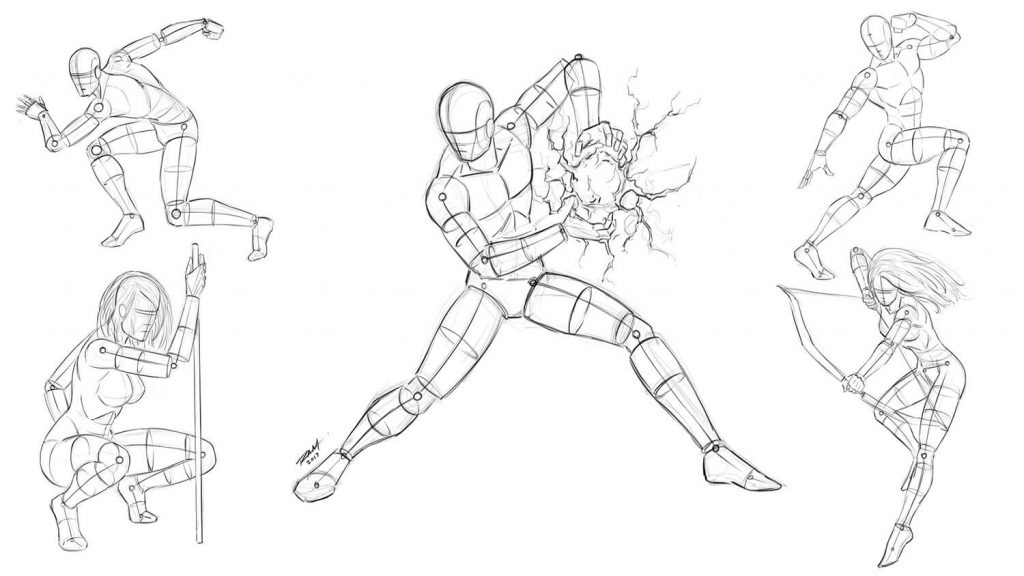
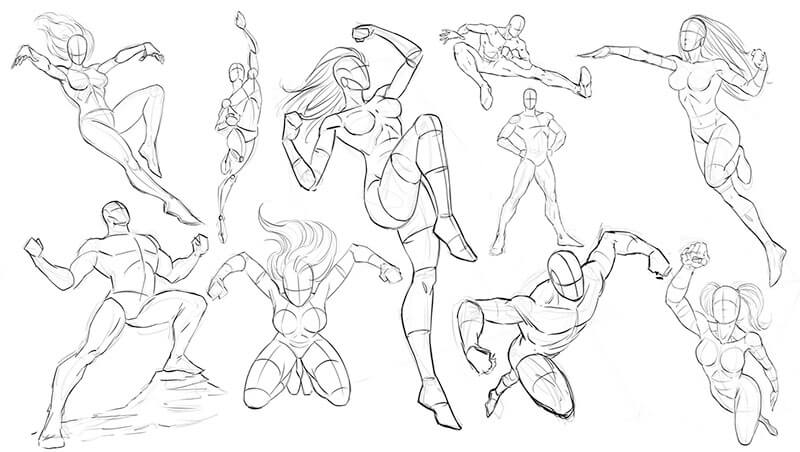
Section 4 – Drawing Dynamic Superhero Poses
Section 5 – Drawing Characters with Perspective and Foreshortening
Section 6 – Creating a Comic Book Scene – Superhero Flying Towards Camera
In this course you will learn how to sketch poses, refine the sketch, measure and adjust proportions, create suit designs, render various materials, create shapes of shadows, draw bodies in perspective, use thumbnails to save time, create dynamic poses, draw a cityscape in perspective, ink the work, apply colors and add final touches!
By the end of this course, I have no doubt you will have a lot better understanding of what it takes to create comic book artwork like the pros! You also get all the art files to study along with.
If you have any questions about this content you are welcome to leave your questions in the Q+A Section. I will answer you back as soon as I can. I am also open to any feedback you have for me to improve the quality of this course for everyone! I will continue to add lessons as needed and you will get all additional updates for free.
In this course, you will learn how to draw dynamic superheroes step by step. You will work along with me as we break down all the major components that comprise the superhero characters that we know and love. You will learn about proportions, anatomy, suit design, foreshortening, rendering, perspective, and how to draw dynamic poses from your imagination. These action poses are essential to creating powerful characters that can tell an amazing story!
If you want to improve your ability to draw a variety of characters effectively, then this course is for you. The techniques that I will teach you here can apply to all sorts of art styles. Everything from game art, comics, concept art, and even figure drawing. These methods will teach you how to draw imaginative bodies with confidence.
I am very confident you will find this course to be a valuable asset in your educational collection but if you find anything that would make this a better experience for you and the other students, please let me know. I will be happy to improve the course content as well as add new lessons when needed.
You also get all the art files to work along with throughout this course. Please share your artwork in the Q&A Section and I will give you any feedback that I can.
I thank you for viewing my course and good luck with your art!
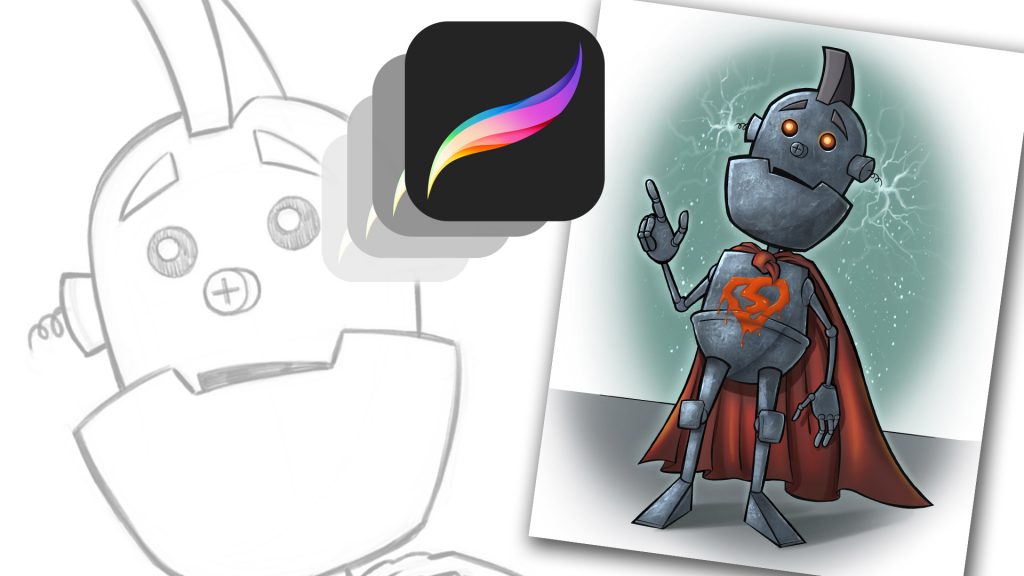
I hope all is well on your side of this crazy rock. I am having fun drawing some new fan art and I wanted to share a few things I have learned while doing so. For those of you that don’t know my process let me explain. I have been drawing comic art for over 20 years now and I used to work on good old bristol board but a few years back I decided to start working digitally. ( I was a messy inker! :>) I know people are rolling their eyes right now. Real artists use traditional tools, right? I get it, you’re in love with the feeling of real paper. I don’t blame you, I draw on paper as much as I can too. Something about it just feels…..you know…natural! I switched because I am a big fan of technology and I like to be on the forefront of it all. Plus, I really just wanted to ink digitally but then later realized the pencils were possible as well. By creating all of it digitally I was saving a lot of time. I no longer had to scan my pages which was always a pain. I know a lot of artists just don’t want to make the switch. I truly don’t blame you, to each their own I guess!
So when I started drawing digitally I bounced around to a few different drawing softwares. I quickly realized Manga Studio 4 could create full comic books as a single document and gravitated over to that. I was a little less than enticed about the drawing process on there. I was still using an Wacom Intuos 3 at the time so that was a bit of a hinderance as well. I hadn’t fully gotten used to drawing on a “lap tablet” as I like to call them. Then I switched to Sketchbook Pro for the pencils and it started to feel more natural. Once I finally upgraded to a Wacom Cintiq 22, I was like a kid in a candy store! I finally had a really nice drawing experience going on. I could pencil and ink all on this device and with the two programs I felt like I was really getting somewhere.
With each new update the programs have gotten better and better. ( For the most part. ) I still didn’t feel like I was creating to the level that I could achieve on paper though. Keep in mind, there is a learning curve with any and everything, so part of it could have been that. I truly believe you can create amazing art with anything if you put your mind and heart into it!
Almost two years ago I started hearing people talk about the new iPad Pro coming out. I was a bit skeptical at first. Maybe good for amateurs but I am a pro and I need a big fat Cintiq on my table. ( By pro I mean a starving artist of course. lol ) Upon seeing other artists work on this device I was quickly sold. I loved the fluid marks they were making. I also thought the Apple Pencil looked more comfortable to work with. Plus I really wanted to be portable with my art creation process. After taking the leap of faith I was quickly at home using the device. It was very intuitive and I was creating the style of art I like rather quickly.
The only issues I had was not being able to use all my favorite programs. I felt a bit stuck. I really enjoy the feel of the device but was missing some great apps to take advantage of it. I even used Astropad for a short time to help bridge the gap but it didn’t fit well into my workflow. I then started using Procreate more and more. Within a few updates this app was really starting to appeal to me. Plus, it records videos and I am such a Youtube junkie these days! 🙂
The Procreate app is extremely well designed. It moves quickly and the interfaces is so streamline you will forget it is there. The brush engine is nothing short of amazing and it has the most natural drawing experience I have found thus far. The Venom art above was drawn in this app. About 90 percent of my work is done there now. I still jump over to my Cintiq when I need dual monitors and have to get some multi-tasking done but I quickly jump back over to my iPad Pro and Procreate combo to knock out some sketches or comic art.
So I just want everyone that reads this to know that the iPad Pro and Procreate is a VERY solid solution to creating professional art on the move. Great battery life and stable as can be! I am here if you have any questions I can help with and if you want to learn more about how I use these two together you can check out my Udemy course here – https://www.udemy.com/procreate-like-a-pro-create-awesome-digital-art-on-an-ipad/?couponCode=RAMCOMICSPOST101
Good luck with your art and thanks for your support! 🙂
I often get into a bad habit of drawing whatever comes to mind. I mean to say, when I start an image I don’t always know exactly where I want it to end up. When I see myself do this too many times I get back to the basics to fix it. That is when I go back to drawing thumbnails like a good little artist should! 😉
Thumbnailing helps you to know where the artwork should end up. It is a way to establish a set of ideas without wasting a huge amount of time. Another way to say it is just “rough sketching” but I think thumbnails are the preferred terminology in comics.
You can work out things like poses, composition, camera angles, movement, energy of the shot, and shapes of shadows. In my opinion, you want to get as much information about the end result as you can within about 2-5 minutes of sketching. This also sparks creativity immensely!
After rough sketching about 5 thumbnails I am usually pretty set to go on my drawing but hey at 2 minutes long no big deal if you need to create a few more, right?
If you want to see a video of this drawing from the thumbnail sketch to the finished pencils you can watch it here on my Youtube channel –
Let me know what you think of it and as always, Keep Drawing and Keep Having Fun! 🙂
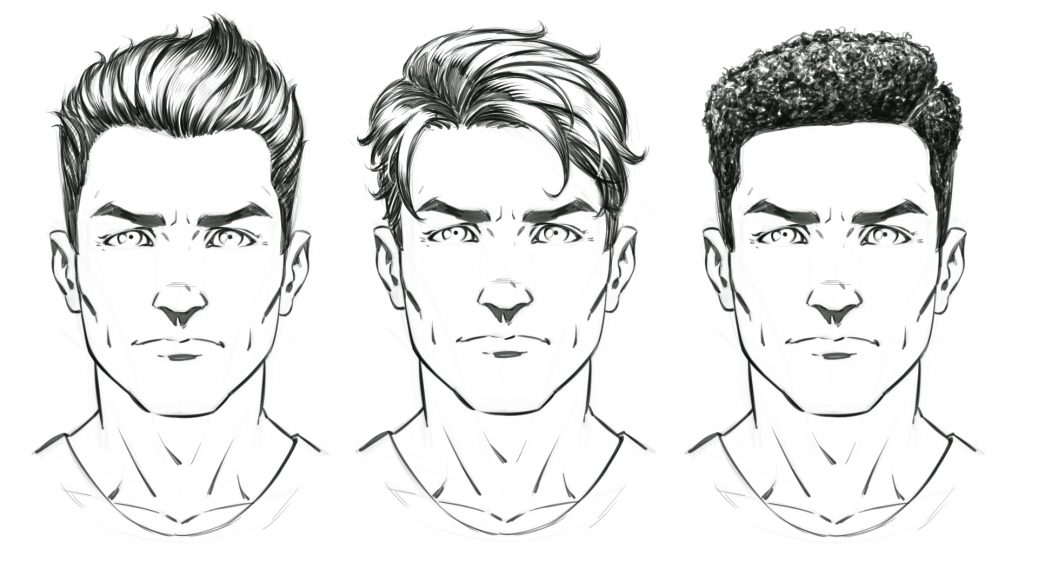
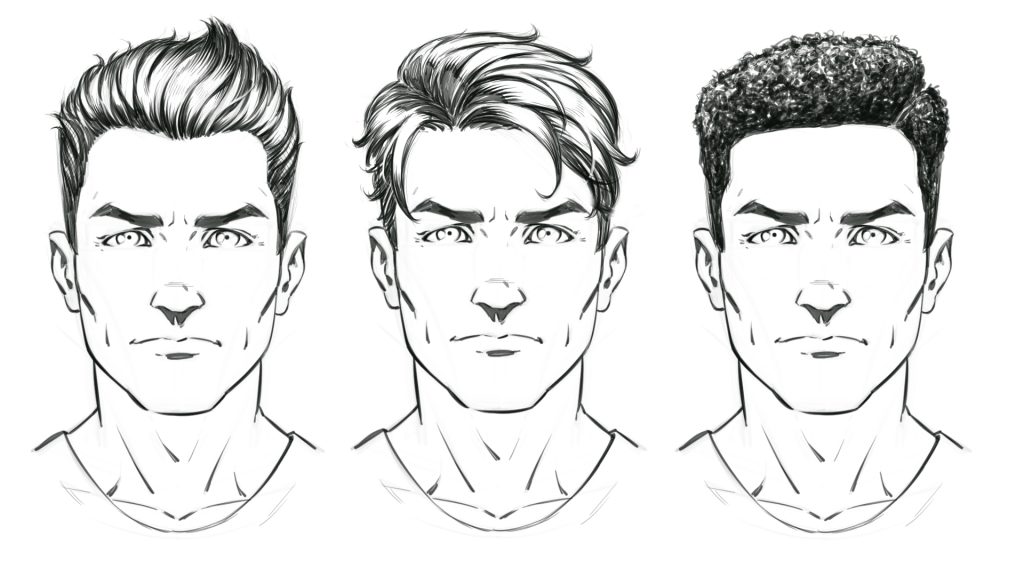
In this class you will learn how to draw these 3 hair styles. We will cover basic form and rendering techniques that will apply to not just these but lots of other various hair styles as well. This should give you a basic understanding of how to design your own favorite hair style for your cool characters!
You will start with a male face that I have created for you. This allows you to simply focus on the hair drawing and not worrying too much about the characters face. Try creating lots of variations over the same pose. See how much you can change the characters look with a new hair style! Have fun with it! 🙂
If you have any questions I am here to help and thank you for your support of my lessons! More on the way real soon….
Robert A. Marzullo
Ram Studios Comics
An Educational Resource for Comic Art Creators and Digital Painters.
Deprecated: trim(): Passing null to parameter #1 ($string) of type string is deprecated in /home2/h0a3d1p3/staging.ramstudioscomics.com/wp-content/plugins/simple-lightbox/includes/class.utilities.php on line 545