Tag Archives: learn to draw comics

How to Draw An Eye – Step by Step ( Comic Style )

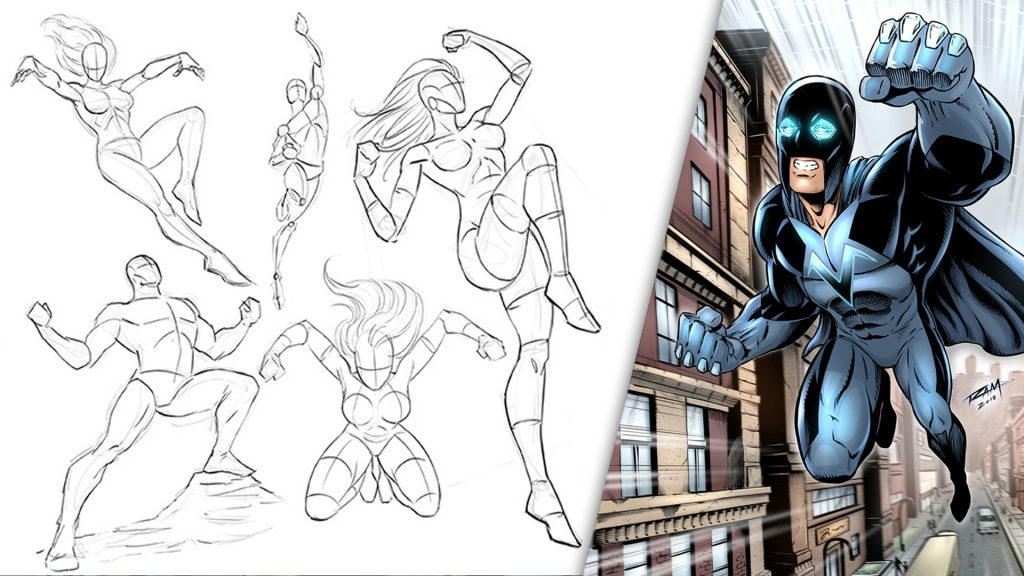
In this tutorial you will learn how to draw a comic style eye step by step. Be sure to practice this often but also to experiment with each stage of this process. You will find your style by experimenting with variations of shapes and rendering so just have fun with it!

In this drawing exercise I will be using a 2H lead on Bristol board smooth paper but you can follow along with whatever art supplies you prefer. Remember to start loose and get some sketches going to warm yourself up.

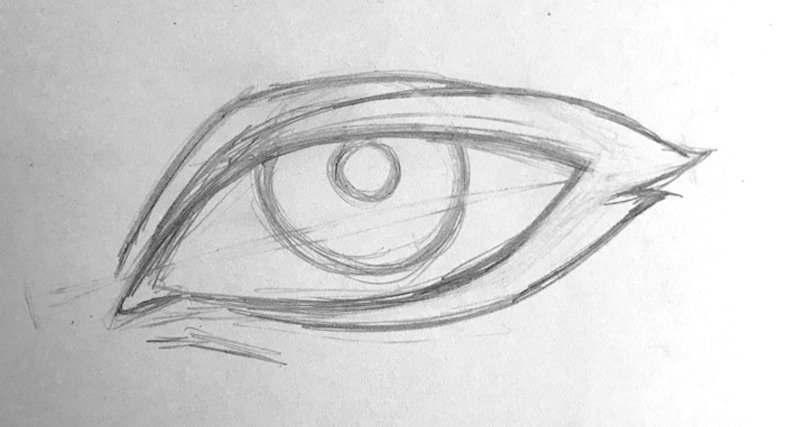
Step 1 – Drawing the Basic Shape of the Eye

Step 1 - Drawing the Basic Shape of the Eye
Drawing Comic Art Style Eye Tutorial

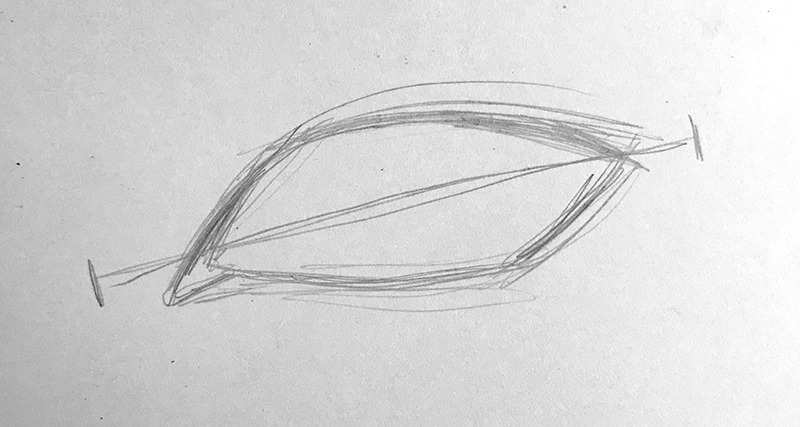
For this first step I like to focus on the overall shape of the eye as well as the angle from the tear duct to the opposite side where the eye lids meet. I tend to notice an upward tilt and by establishing that early on, it becomes easier to consistently draw them.

This is an excellent time to play with various differences in the shape of the eye. Practice making the shapes more narrow, more rounded, more pointed to one side, and so on. You can create all sort of fun variations for your comic book character types!

Step 2 – Drawing the Iris and the Pupil

Step 2 - Drawing the Iris and the Pupil
Step 2 – Drawing the Iris and the Pupil

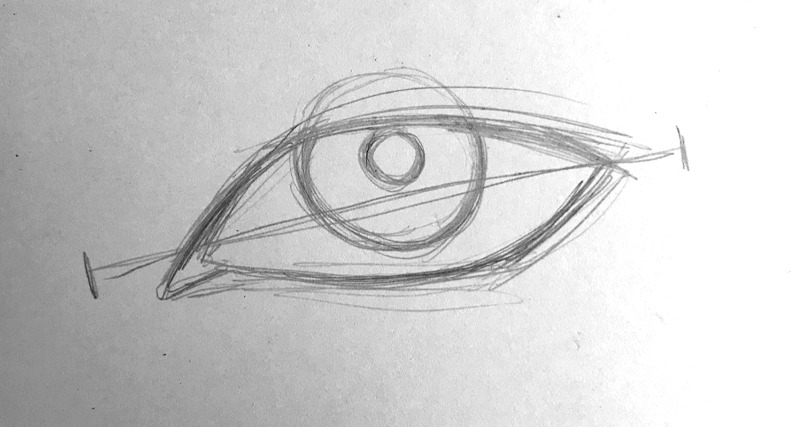
For the second step, draw in the iris and the pupil. A good rule of thumb is that the iris is about one third the distance across of the eye. To be honest I experiment with this proportion as well. Sometimes to really push the expression of fear or excitement I will purposely make the iris smaller by comparison. It’s comics so we can get away with it I promise.

Also notice that the iris is touching the top eye lid. This gives a more relaxed look to the eye. Subtle differences in the position of the iris and pupil can change the expression of the character so keep an eye on it!

Step 3 – Drawing the Shape of the Eyelid

Step 3 - Drawing the Shape of the Eyelid
Step 3 – Drawing the Shape of the Eyelid

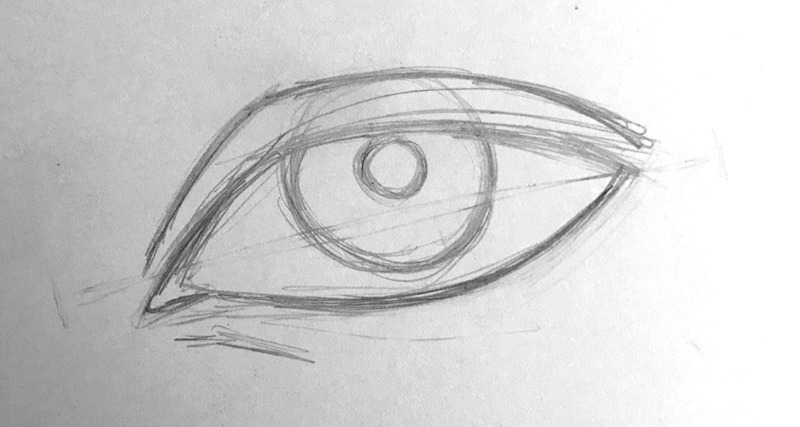
In this third step, draw the shape of the eyelid. This can pretty much follow the existing edges but I like to taper it a bit taller as it moves around the rounded or middle part of the eye. We have to try to envision the spherical form of the eye ball beneath the skin. Again, play around with this area within your work to find what suits your style the best.

Step 4 – Drawing the Shape of the Eye Lashes

Step 4 - Drawing the Shape of the Eye Lashes
Step 4 – Drawing the Shape of the Eye Lashes

In this fourth step, I like to draw the eye lashes as large basic shapes. This helps me to simplify the process a bit and it makes a lot of sense for comics especially when you are drawing your smaller faces within a scene. Individual eye lashes are great for close ups but that’s about it. Besides you can always add those in as you will see shortly.

I think it goes without saying but this is another on of those times where you can really experiment with a variety of shapes. I will be honest and tell you I didn’t like the look of this stage of the work but I knew I could save it so I pressed forward. Some times you just have to keep fiddling with it and not give up!

Step 5 – Drawing in the Shape of the Eyebrow

Step 5 - Drawing in the Shape of the Eyebrow
Step 5 – Drawing in the Shape of the Eyebrow

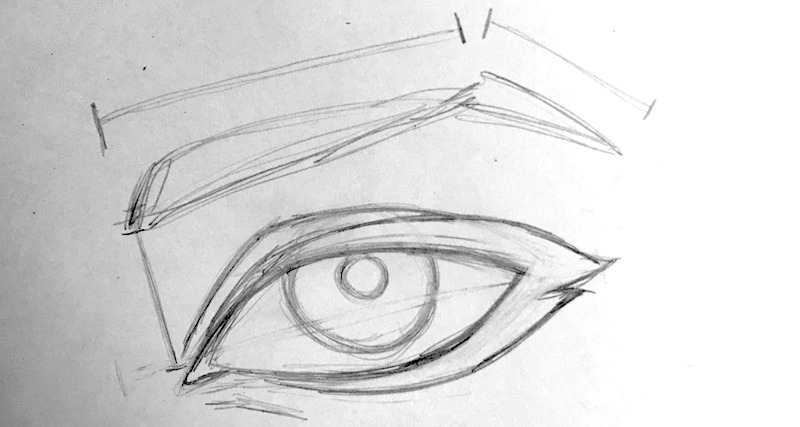
In this fifth step, draw in the shape of the eyebrow with some basic angles in mind. I like to imagine the plane changes of the characters forehead when doing this. I also feel that by keeping this step as simple as possible I can lay in the ground work for the details later. If I start by trying to draw in a bunch of little hairs I tend to end up with a mess. No one likes messy eyebrows!

Step 6 – Drawing the Glare and Shadow

Step 6 - Drawing the Glare and Shadow to the Eye
Step 6 – Drawing the Glare and Shadow to the Eye

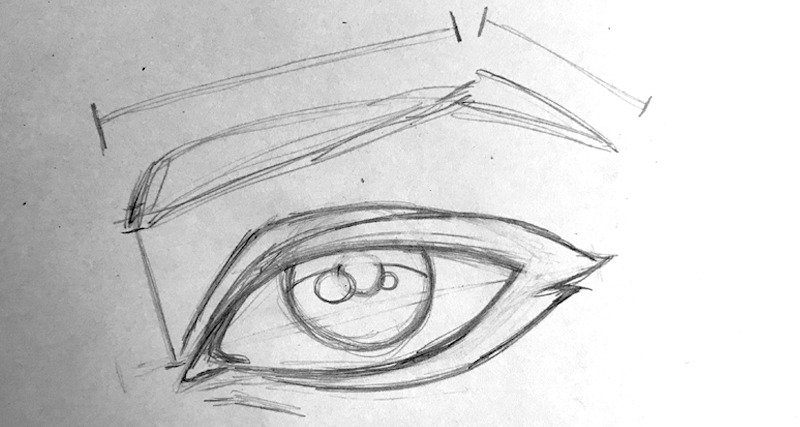
In this step we will draw the glare and the shadow on the iris. Draw the shadow over the iris as a curve. This helps to push the look that the eye is a sphere and not a flat object. Then draw in the glare on the highest point of the eye, usually right by the pupil. This is another chance to play around with style choices but then again, you already knew that didn’t you?

Step 7 – Draw in the Shadows and Add Some Eye Lashes

Step 7 - Draw in the Shadows and the Eye Lashes
Step 7 – Draw in the Shadows and the Eye Lashes

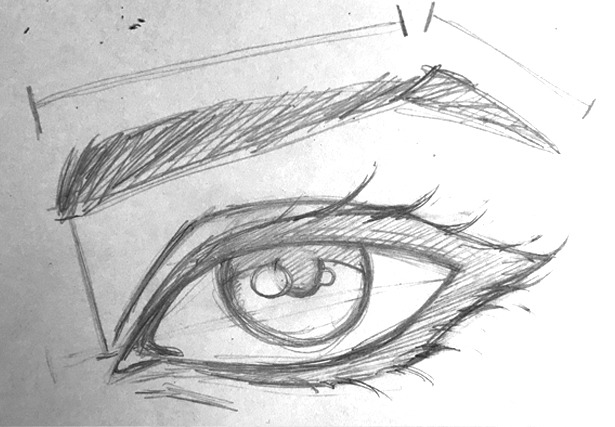
In this step we can fill in the shadows and add some eye lashes. I tend to change the shape of the eye lashes as I do this. Sometimes I will erase back the perimeter shape so that I can try different effects with the eye lashes. I like paying attention to other comic artists and how they define this area of their work. One of my favorites to study for eyes is the late Michael Turner (RIP). His work is breath taking and the way he rendered eyes was nothing short of AMAZING!

Step 8 – The Final Rendering

Step 8 - The Final Rendering
Step 8 – The Final Rendering

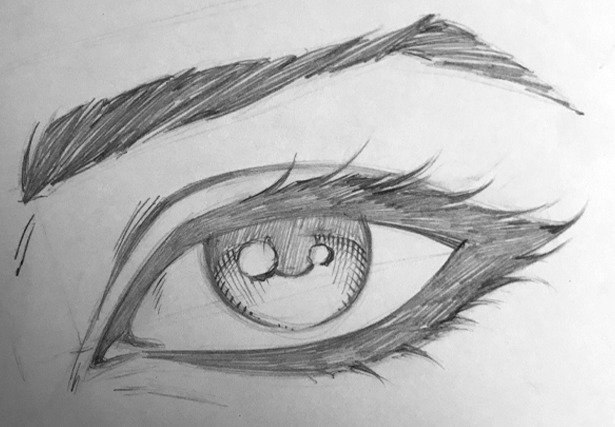
In this final step, soft eraser all those rough lines and clean it up. I like to push and pull the lines here. Some need a little more curve and some need a little less. I also like to add in a bit of cross hatching to the eyes to create a look of tonal value. And, that’s it. You can take these same steps and apply them to all sorts of eye variations.

For some more examples you can head over to our Artist Resources and Templates page here – https://staging.ramstudioscomics.com/index.php/art-resources-templates/

I hope you found this drawing tutorial to be helpful and if you did please share the content with your fellow artists. More on the way soon and good luck with your art!

Sincerely,

Robert A. Marzullo

Ram Studios Comics

How to Draw a Muscular Arm Pose – Step by Step – Tutorial

In this tutorial we will be drawing the outside of a male muscular arm. This time it’s the old, “Which Way to the Beach” pose. We have all done it one time or another, right? Let’s get to it!

Step 1 – Draw out the direction of the pose with the line and circle method. Think of these like the bones under the muscles and at this stage just focus on the length and direction of each section of the arm and hand. Notice the relationship from the wrist to the shoulder and the shape of the base of the hand from this angle.

They are both triangular. It helps to notice shapes like these to make your drawings more consistent.

Drawing an Arm Pose – Step 1 – Arm Structure

Step 2 – Now draw out the cylinder shapes to establish the basic forms. Think of a mannequin or marionette. Keep it simple and still only think about proportions and direction of the segments. Also be open to changes at any stage of this process.  Correcting things early on will save you lots of time and heartache.

Drawing an Arm Pose – Step 2 – Basic Forms

Step 3 – Now soft erase your lines and start to draw more curvature for your anatomy. Notice the way that each area tapers inward to meet the next. The shoulder tapers in to meet the upper arm and the upper arm tapers in the meet the lower arm and so forth. And notice where I changed the shape of the anatomy to go inside and outside of the initial mannequin stage. The basic construction is only meant to be a guide, so I never hesitate to make changes if I see something that could be better.

Drawing an Arm Pose – Step 3 – Anatomy

Quick Tip – Study anatomy often but improve over a long period of time. Don’t let the idea of perfection slow you or stop you from completing your work!

Step 4 – Now like before, soft erase your lines and begin to refine the anatomy a bit more. This time giving more line weight and clarity to the drawing. You can also start to draw in some veins to add to the depth and realism to the drawing.

Drawing an Arm Pose – Step 4 – Refining the Line Work

Step 5 – Draw in the shapes of shadows to your muscles. And if you are working with an inker make sure to sketch the small x’s so they can read the artwork more clearly. You don’t necessary have to do this step if you are your own inker but it doesn’t hurt to get in the habit, just in case!

Drawing an Arm Pose – Step 5 – Adding in the Shapes of Shadows

Step 6 – Now add in your rendering lines and really start to make the artwork pop off the page. Notice how the veins cast a small shadow of their own on one side. And, how they catch light on them even in the shadow of the arm. This is more stylized but it gives the appearance of depth. Overall this is a very stylized arm drawing but that is the fun of comics, not everything has to be entirely accurate!

Drawing an Arm Pose – Step 6 – Rendering and Cross Hatching

I hope you’ve enjoy this quick tutorial on stylized arm anatomy for comics. This is a sample tutorial from my book “Learn to Draw Action Heroes” which you can find on Amazon or at Barnes and Nobel.

If you want more educational content like this and prefer video courses you can get them here – https://ram-studios-comics-art-school.teachable.com

Thank you for stopping by and more tutorials are on the way soon.

Keep drawing keep having fun! 🙂

-Robert

Drawing for Comics – The stages of comic art

In this post I want to talk a bit about the primary stages of the drawing process for comics. There are obviously a lot of different ways to create stunning art for comics but the main ones that come to mind are the rough sketch, the pencils or refined lines, and the inks!

Most artists develop the work in this way but not every artist goes about it the same. Some comic artists can draw a clean image over a very loose sketch and sometimes no sketch at all. Yes, they do exist and yes, I do want to Karate kick them in the face. Just kidding…I don’t know Karate. 😂

People like me at least need to refine things a bit more to stay consistent with my end result. Some artists might need to draw things over and over again to get what they want. The point is, whatever works for you is, “The Right Way!” Over time we all get better at skipping steps that once were essential to the goal. It’s kind of the magic of art really. It’s also why it’s so powerful when you see the work of an artist you admire. You are witnessing the collective ability that they have acquired over years and years of hard work. That is the reason they make it appear so easy. Drawing for comics isn’t an overnight process, it’s a journey so be ready.

Step 1 – The Rough Sketch

I take my time with the initial sketch. Let me be specific, I take as much time in the thumbnail stage as it takes to know I have a good concept to work from. I purposely draw them loose and fast. I know, I just contradicted myself. I draw them quickly because they are small and very little detail but I also take my time to draw as many as I need to get the composition right. Not getting caught up in the details too soon.

Drawing for comics is a tricky thing. We tend to overthink it or put details where they don’t belong or will not even get noticed. Try to think big to small as you layout your scene. If the big shapes make sense then all those amazing details will just be icing on the cake.

J. Jonah Jameson from Spider-man “Get me Parker!!”

Drawing for comics is hard work but it gets much easier when you plan it out!

Step 2 – Refining the Pencils

Now I move to exploring my composition. Refining the lines and seeing if I can realize my original vision. The good news is if you work through the rough sketch properly this part is much easier. If you fail to put in the necessary ground work then you have to work harder at this stage. Some artists can envision things a bit better but if you can’t just double check you initial sketch. Check the perspective, proportions, composition, and gesture. Chances are if those things are working this stage will be much more fun!

Tighten up the work and add in the details but not everywhere. You have to have negative space for the viewers eye to rest. Cluttering up every square inch of the page can actually hurt the scene. Use a combination of angles and curves to explain the forms. Too much of one or the other can leave the art feeling too stiff or too soft. Same rules apply to texture. Some surfaces need to look shiny, some need to look gritty. Balancing out the contrast while keeping your focal point In mind is the key.

Step 3 – Inking the Work

Now you get to put those pretty solid lines everywhere. This is where the real commitment comes in. I like to think about this part as making the art feel solid but not so much that it looks lifeless. Not always easy to do, for me anyways. Depending upon your style, rendering can make things appear overly stiff. Just do your best to remember that initial concept. That is one of the reason I like to save the incremental steps as I work. I can look back and see where I may have lost the initial energy of the thumbnail sketch.

I also think that when your inking the work you should experiment with different levels of shadows and cross-hatching.

Some styles work better with less and the opposite can be true too of course. Another thing I like to pay special attention to is the time to add all those glorious little details.

As I mentioned before, think like a painter does, large to small. Make sure everything works with the bigger shapes and then render in the tighter refined lines. We can get caught up in the details that no one ever really sees. Plus, we are trying to draw comics here. Waste too much time and we miss our deadline and no one wants that!

In what ways do you stage your work or break things down. Be sure to comment below and let others know how you draw for comics. We all learn and grow together.

I hope you find this post helpful and be sure to share the content. Good luck with your art and remember to have fun along the way! 🙂

-Robert

Do You Want to Learn more? Check out my Art Courses herehttps://ram-studios-comics-art-school.teachable.com

You can sign up for my free course on The Importance of Thumbnail Sketchinghttps://ram-studios-comics-art-school.teachable.com/p/the-benefits-of-drawing-with-basic-forms-and-thumbnail-sketches/?product_id=2474109&coupon_code=RAMSITEDRAWFORCOMICS

Update on How to Draw Dynamic Superheroes – Start to Finish!

How to Draw Dynamic Superheroes Start to Finish

How to Draw Dynamic Superheroes – Start to Finish!

Hello Fellow Comic Artists!

I have been working on some new content to add to my existing Udemy course,  How to Draw Dynamic Superheroes – Start to Finish!”

I have just included over 5 Hours of new content in this course.  Putting it at over 9 Hours long with 28 NEW lessons.  In this section, I show you how to draw, ink, and color a fully detailed comic book scene or cover piece.  This helps to implement all of the previous lessons taught throughout the course.  Which should help to commit the important parts to your memory!

Here is a breakdown of what the current curriculum looks like :

Section 1 – Basic Proportions of the Superhero Male

Section 2 – The Superhero Female

Section 3 – Drawing the Muscle Bound Brutes

Section 4 – Drawing Dynamic Superhero Poses

Section 5 – Drawing Characters with Perspective and Foreshortening

Section 6 – Creating a Comic Book Scene – Superhero Flying Towards Camera

In this course you will learn how to sketch poses, refine the sketch, measure and adjust proportions, create suit designs, render various materials, create shapes of shadows, draw bodies in perspective, use thumbnails to save time, create dynamic poses, draw a cityscape in perspective, ink the work, apply colors and add final touches!

By the end of this course, I have no doubt you will have a lot better understanding of what it takes to create comic book artwork like the pros! You also get all the art files to study along with.

If you have any questions about this content you are welcome to leave your questions in the Q+A Section.  I will answer you back as soon as I can.  I am also open to any feedback you have for me to improve the quality of this course for everyone! I will continue to add lessons as needed and you will get all additional updates for free.

Here is my Udemy Discount Code to get the Lowest Price on this course – https://www.udemy.com/how-to-draw-dynamic-comic-book-superheroes-start-to-finish/?couponCode=RAMSTUDIOSCOMICS

Here is the Promo Video for this course –

Thank you for checking out this course and good luck with your art! More videos are on the way soon! 🙂

Robert A. Marzullo

Ram Studios Comics