Tag Archives: game art

Character Design – The Power of Silouettes​

Hello Fellow Artists!

I wanted to share some of my findings on using silhouettes for your art. In this case I will be sharing the effect it has on character design but really this can apply to pretty much anything. It is wildly popular for concept art but can even work for other styles of art such as comics and cartooning .

So what is a silhouette? Why does it matter? A silhouette is a two-dimensional representation of the outline of an object, as a cutout or configurational drawing, uniformly filled in with black, especially a black-paper, a miniature cutout of the outlines of a person’s face in profile. Simply put, the silhouette is the outline of anything we might be looking at.

It matters because we are extremely good at spotting things based upon their silhouette. Don’t believe me? Have you ever seen Batman’s silhouette and thought it was Winnie the Pooh? Probably not likely. Also, a strong easy to read silhouette translates into a strong character design. This is one of the many reasons character designers use the power of silhouettes at the beginning of their creative process. It also allows for a fast workflow to developing ideas.

Character Design Silhouettes by Robert A. Marzullo

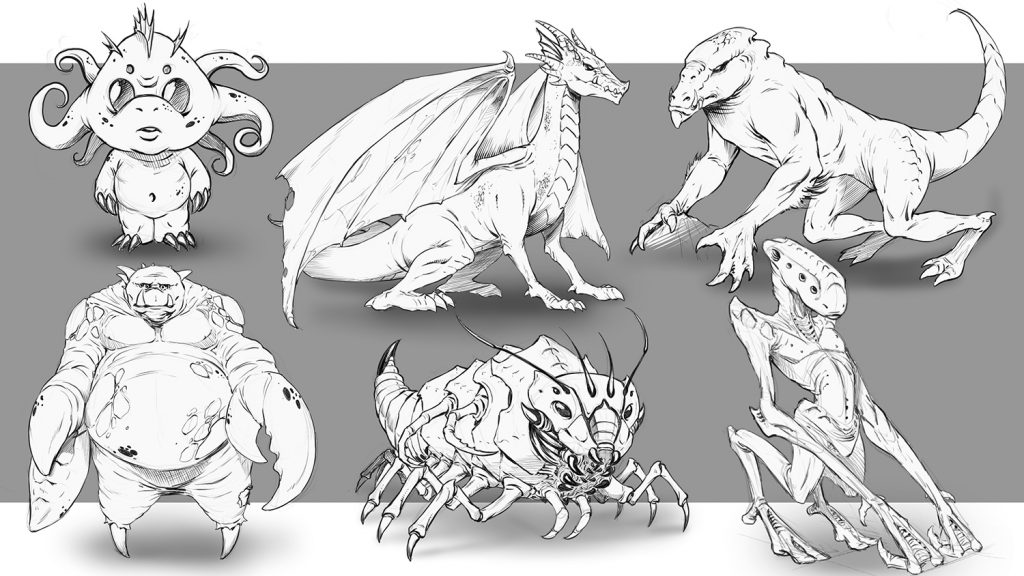
Try creating some basic character designs with this method. Don’t worry yourself too much about any idea of perfection. Allow yourself to make mistakes and have fun with the process. Remember, this is an exploration of ideas. Keep the process loose and energetic. Think of things like the posture and backstory of the character and less about the details. With a silhouette, it is pretty easy to keep adding details after the initial gesture is in place anyways. As you get more comfortable with the process you will start to envision more ideas right from the start.

Another great way to use this to spark your creativity is to start with one idea and then make each additional character design vastly different. This allows you to express a ton of creativity in a short amount of time. Just like doing gestures before figure drawing, this is a great way to start your character design process. These silhouettes can be saved and reused as well. You can even experiment by overlapping them to create new inventive ideas.

Elven Witch - Character Design - by Robert A. Marzullo
Elven Witch – Character Design – by Robert A. Marzullo

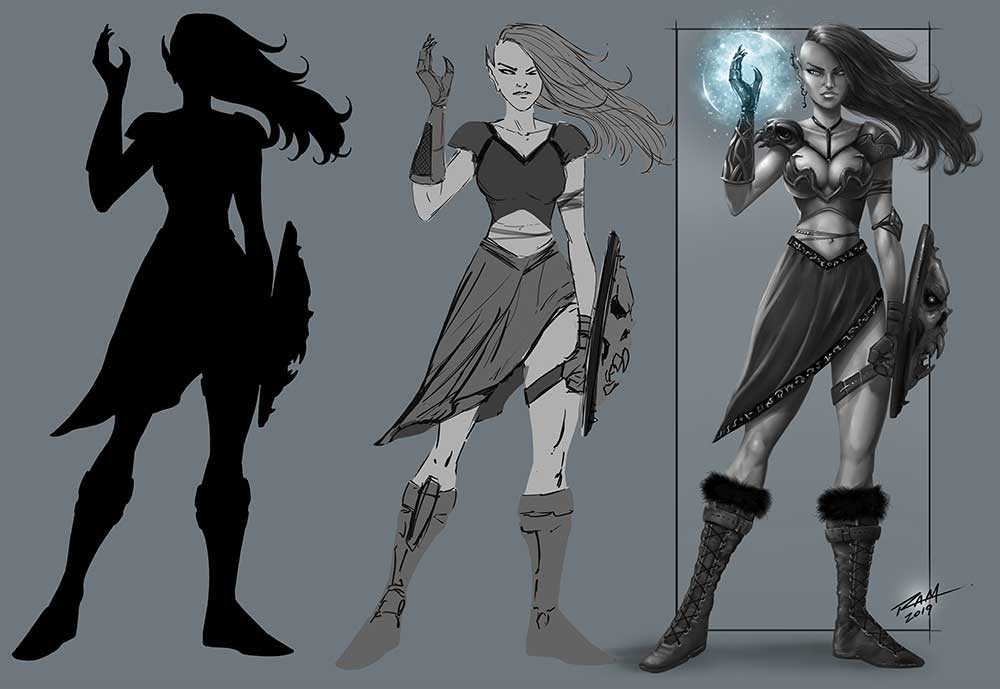
Then you can take these silhouettes and begin to refine them with values. Values are basically what you see when you convert a color image to a grayscale image. By painting in the values to your character design you can focus on the depth and form first. Unless you are a pretty confident painter, painting with colors can be distracting. It really depends upon what your strenghts are as an artist. The reason value painting is so popular in character design is that it allows the client to see the progression of the work and make changes. Whenever working with a client you want to try to create your work in even passes. This way you don’t spend all day detailing one area of your character concept only to have the client ask for an update. It will be much easier for them to read what is going on if you in smaller passes over the character design.

Warrior Character Design - Stages of the Work by Robert A. Marzullo
Warrior Character Design – Stages of the Work by Robert A. Marzullo

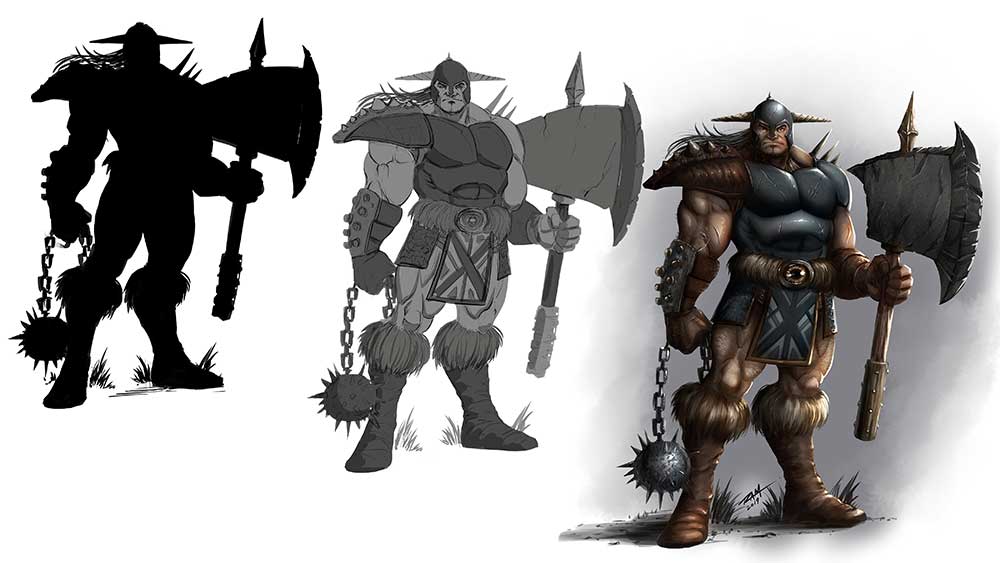
After you have worked through the entire design process you can begin to apply color. When using Clip Studio Paint or Photoshop, you can apply color with a new layer. Play with the “Blending Modes” ( PS ) or the “Combine Modes” ( CSP ) set to Color, Overlay, etc. You can apply color on just one layer but for more variety in the work, you can use a few color layers together. I will be adding information to this post so be sure to check back as I create more studies.

You can even use this same shape thought process to create dynamic comic book poses. Here is a video of me explaining that process on my Youtube channel – https://youtu.be/6MfVCC7m5R8

Thank you for viewing and let me know if you have any questions or suggestions for new content!

Good luck with your art!

-Robert

Want to learn more? Check out my Gumroad for Video Lessons and Custom Brushes – http://www.gumroad.com/robertmarzullo

or Check out my ART Classes here on Skillshare – https://www.skillshare.com/r/user/ramstudioscomics

How to Improve Your Creature Design Drawing – Step by Step – Course

Creature Design Class

How to Improve Your Creature Design Drawing – Step by Step

In this course you will learn how to draw a variety of creature concepts. I will walk you through all the techniques that I use to draw imaginative creatures every day. This course is good for traditional and digital artists.

You will learn how to draw various studies to improve your knowledge and gain inspiration. We will cover break downs of specific areas in the creature anatomy to better understand how their bodies work.

You will learn to draw and study the spine since it is the foundation of almost any creature you will draw. I will walk you through creating lots of different concepts in this course.

Here is a break down of the Lessons that are currently available –

L1 – The Spine Says it All – In this lesson you will learn why studying the spine is so important and follow along with me as I illustrate a few examples.(Run Time – 13:09)

L2 – Thumbnailing the Concepts – In this lesson we will thumbnail 11 different concepts. This is an integral part of the design process. By keeping the ideas loose and the sketches quick ( 5-6 Minutes ) you can express a lot of concepts to work from. (Run Time – 8:54)

L3 – The Brain Box – In this lesson you will learn how to draw various heads for our creatures. We will talk about some of the differences that define predators and prey. (Run Time – 9:19)

L4 – Creating Variations in Your Concepts – In this lesson we will draw 6 creature designs but focus on making each one very different from the previous example. This can be a great way to stretch the imagination. (Run Time – 12:00)

L5 – Animal Leg Studies – It is important to study various parts of animal anatomy to gain perspective on your creature designs. Here we will draw 3 examples from animals and adjust them slightly to look more imaginative. (Run Time – 7:57)

L6 – Merging Concepts Together – In this lesson you will work with me as I draw 6 different creature limbs. Each will have at least 2 various traits mixed together to create the design. (Run Time – 11:04)

L7 – Adjusting Proportions – In this lesson you will learn how to create a creature concept and then adjust the proportions to make a very different version of that same creature. This can be another very useful exercise in developing a unique creature design. (Run Time – 11:03)

L8 – Project Ogre Thumbnails – In this lesson you will learn how to work from a script like a real pro does. This is a fun and important exercise to do so let’s get to it. We will start by drawing out our thumbnails to this concept. (Run Time – 17:02)

L9 – Cleaning up the Concept – In this lesson we will draw one more thumbnail and make our decision on what to keep and what to pitch. We will then start to clean up our sketch. (Run Time – 17:08)

L10 – Refining the Drawing – Now the heavy lifting has been done and we will start to refine the line work and make it pretty for the client or our portfolio…or both! (Run Time – 18:50)

More lessons are on the way and I am here if you have any questions or feedback for me. You also get access to all of these art files to study from.

Get Lifetime Access to this Course here – https://ram-studios-comics-art-school.teachable.com/p/how-to-improve-your-creature-design-drawings-step-by-step

Get a glimpse into this course here on my Youtube channel – https://youtu.be/FVDKCH8IwP4

Robert A. Marzullo                                                                                                      Ram Studios Comics