Tag Archives: comic book artist

How to Draw a Muscular Arm Pose – Step by Step – Tutorial

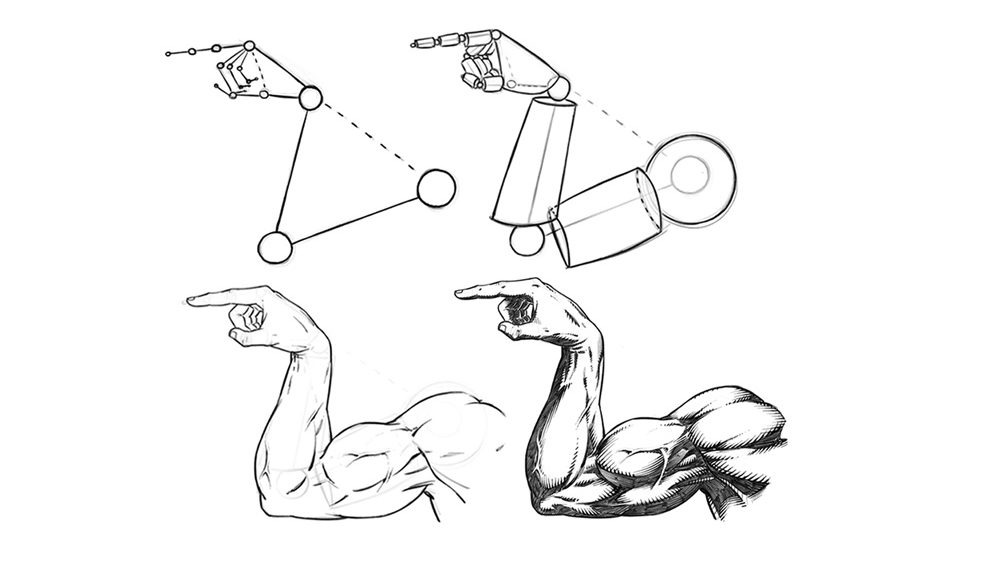
In this tutorial we will be drawing the outside of a male muscular arm. This time it’s the old, “Which Way to the Beach” pose. We have all done it one time or another, right? Let’s get to it!

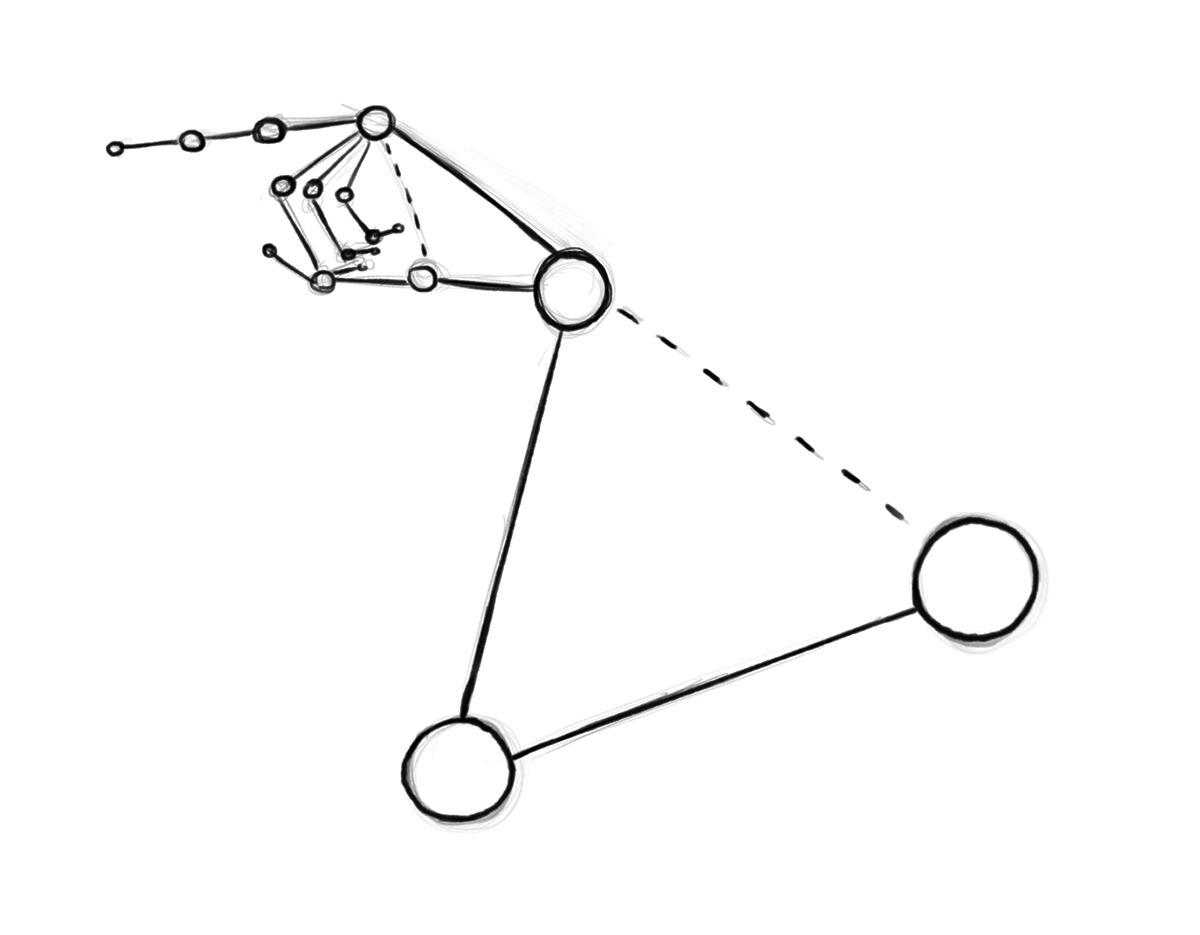
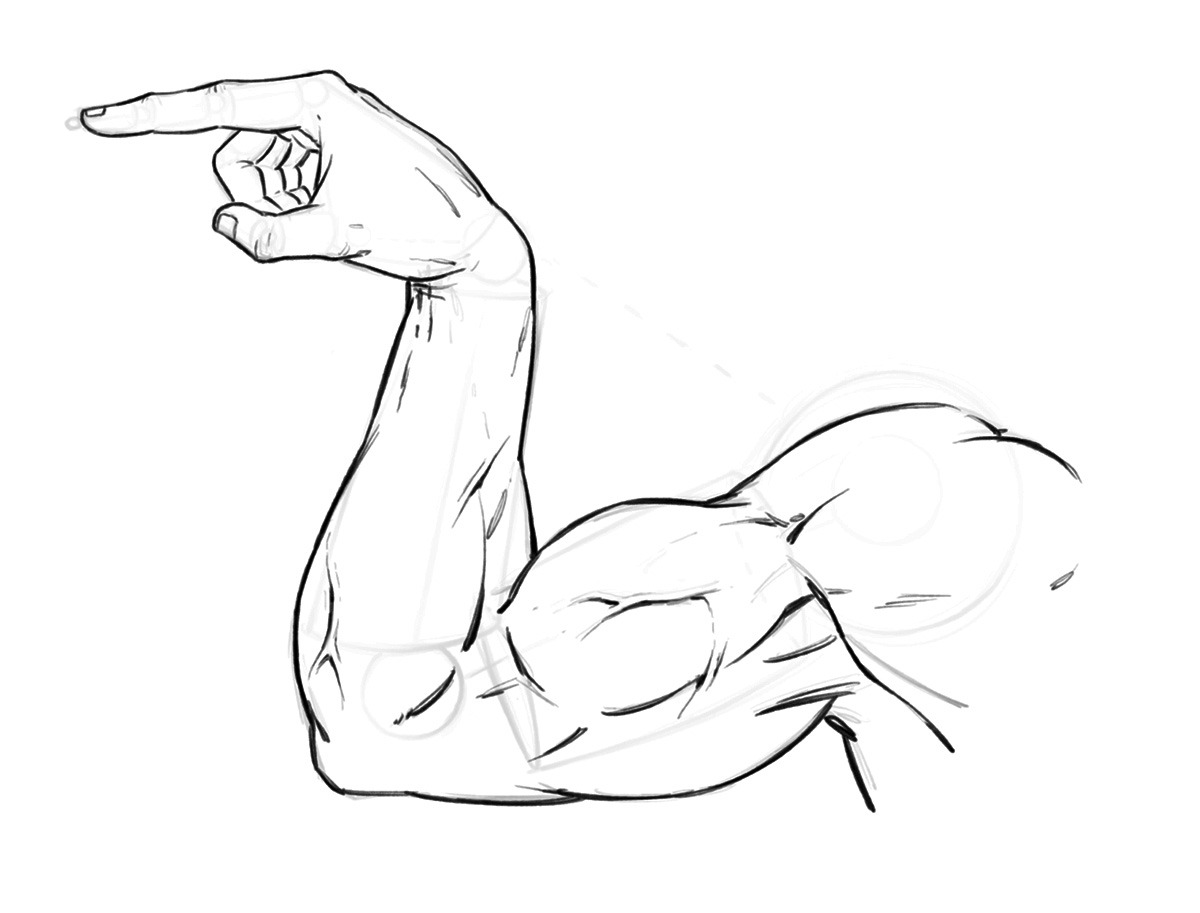
Step 1 – Draw out the direction of the pose with the line and circle method. Think of these like the bones under the muscles and at this stage just focus on the length and direction of each section of the arm and hand. Notice the relationship from the wrist to the shoulder and the shape of the base of the hand from this angle.

They are both triangular. It helps to notice shapes like these to make your drawings more consistent.

Drawing an Arm Pose – Step 1 – Arm Structure

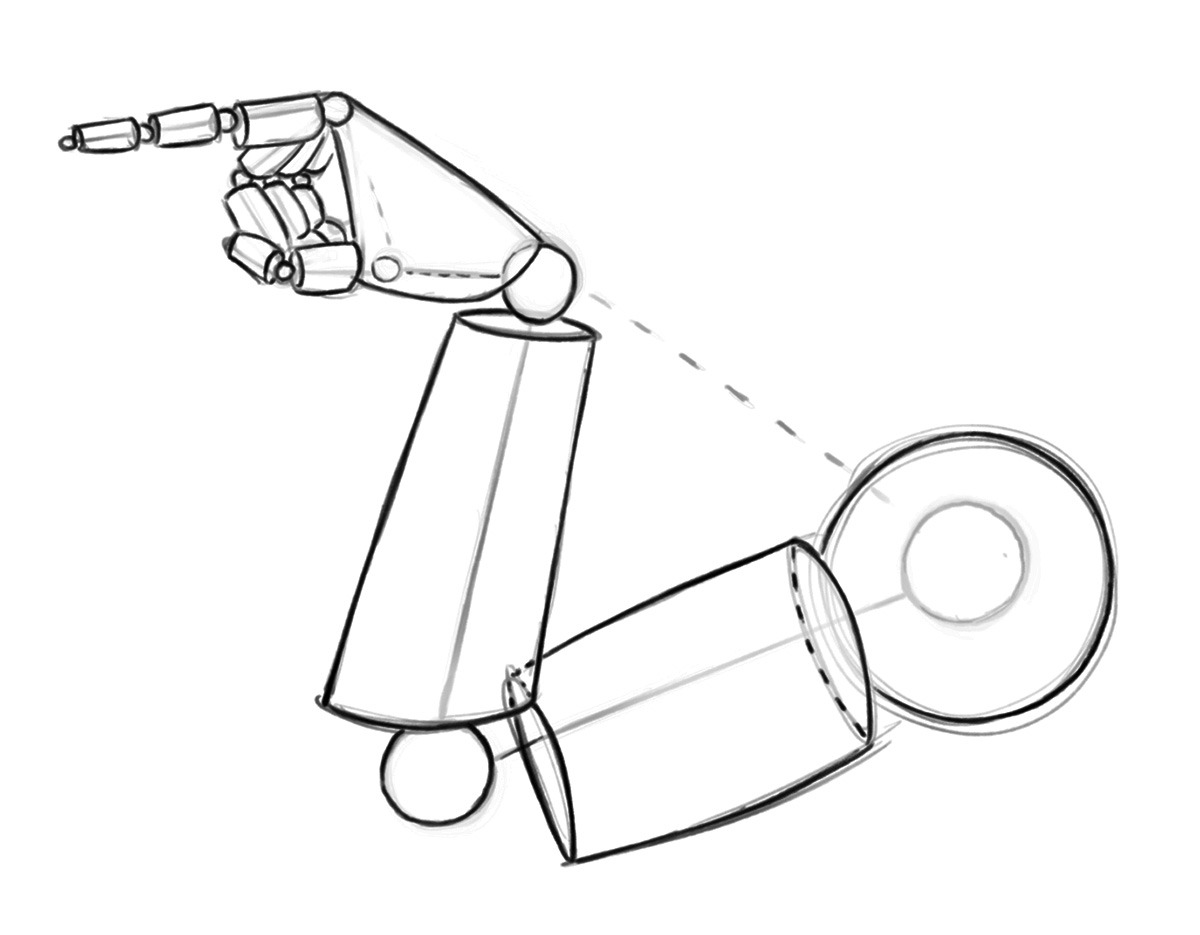
Step 2 – Now draw out the cylinder shapes to establish the basic forms. Think of a mannequin or marionette. Keep it simple and still only think about proportions and direction of the segments. Also be open to changes at any stage of this process.  Correcting things early on will save you lots of time and heartache.

Drawing an Arm Pose – Step 2 – Basic Forms

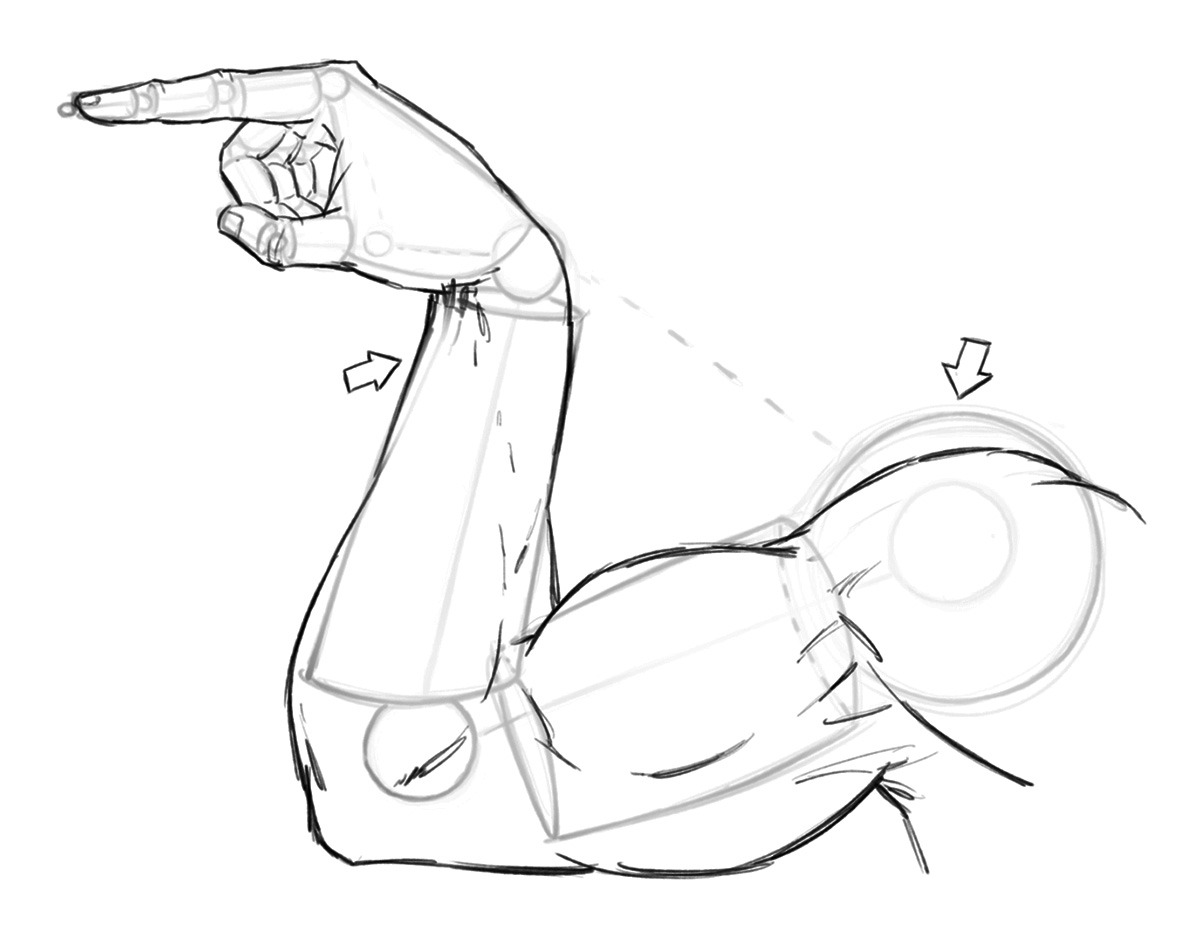
Step 3 – Now soft erase your lines and start to draw more curvature for your anatomy. Notice the way that each area tapers inward to meet the next. The shoulder tapers in to meet the upper arm and the upper arm tapers in the meet the lower arm and so forth. And notice where I changed the shape of the anatomy to go inside and outside of the initial mannequin stage. The basic construction is only meant to be a guide, so I never hesitate to make changes if I see something that could be better.

Drawing an Arm Pose – Step 3 – Anatomy

Quick Tip – Study anatomy often but improve over a long period of time. Don’t let the idea of perfection slow you or stop you from completing your work!

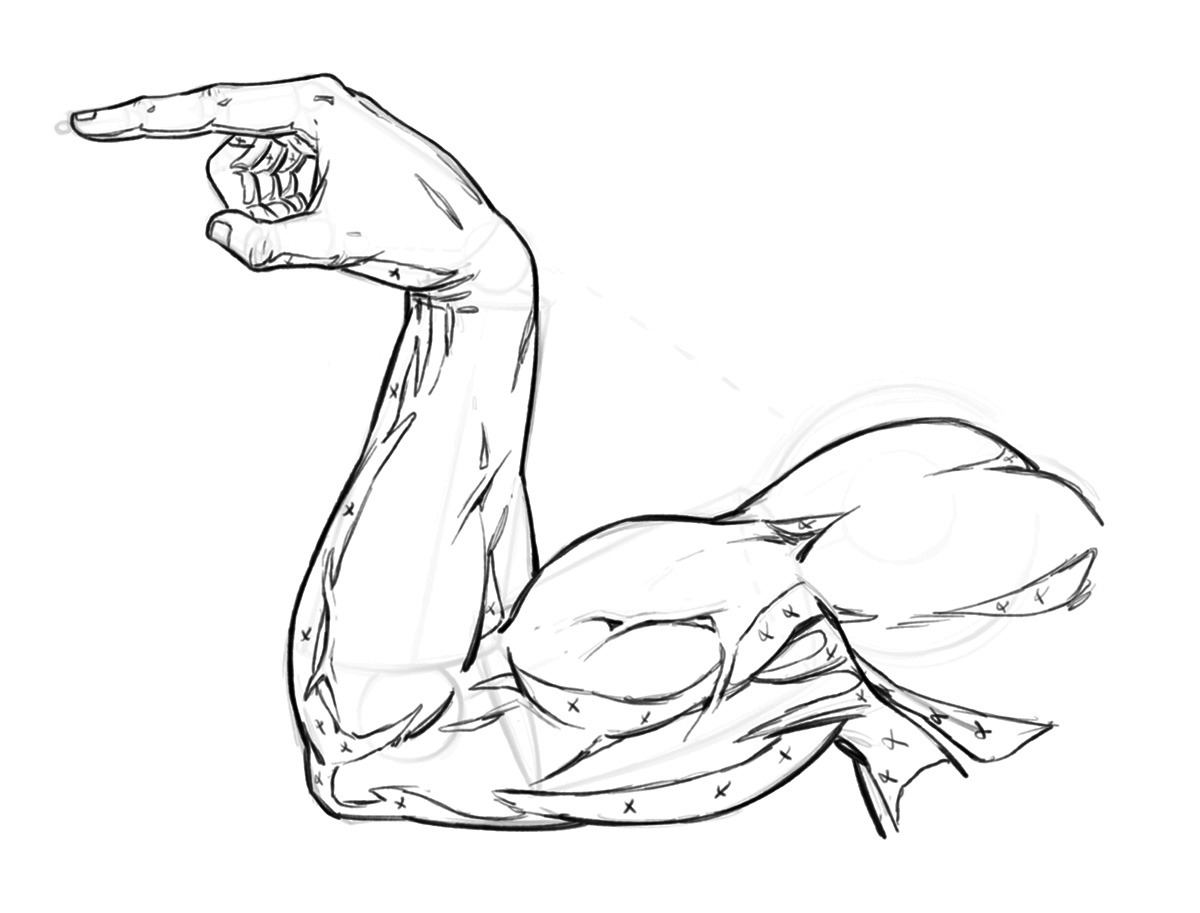
Step 4 – Now like before, soft erase your lines and begin to refine the anatomy a bit more. This time giving more line weight and clarity to the drawing. You can also start to draw in some veins to add to the depth and realism to the drawing.

Drawing an Arm Pose – Step 4 – Refining the Line Work

Step 5 – Draw in the shapes of shadows to your muscles. And if you are working with an inker make sure to sketch the small x’s so they can read the artwork more clearly. You don’t necessary have to do this step if you are your own inker but it doesn’t hurt to get in the habit, just in case!

Drawing an Arm Pose – Step 5 – Adding in the Shapes of Shadows

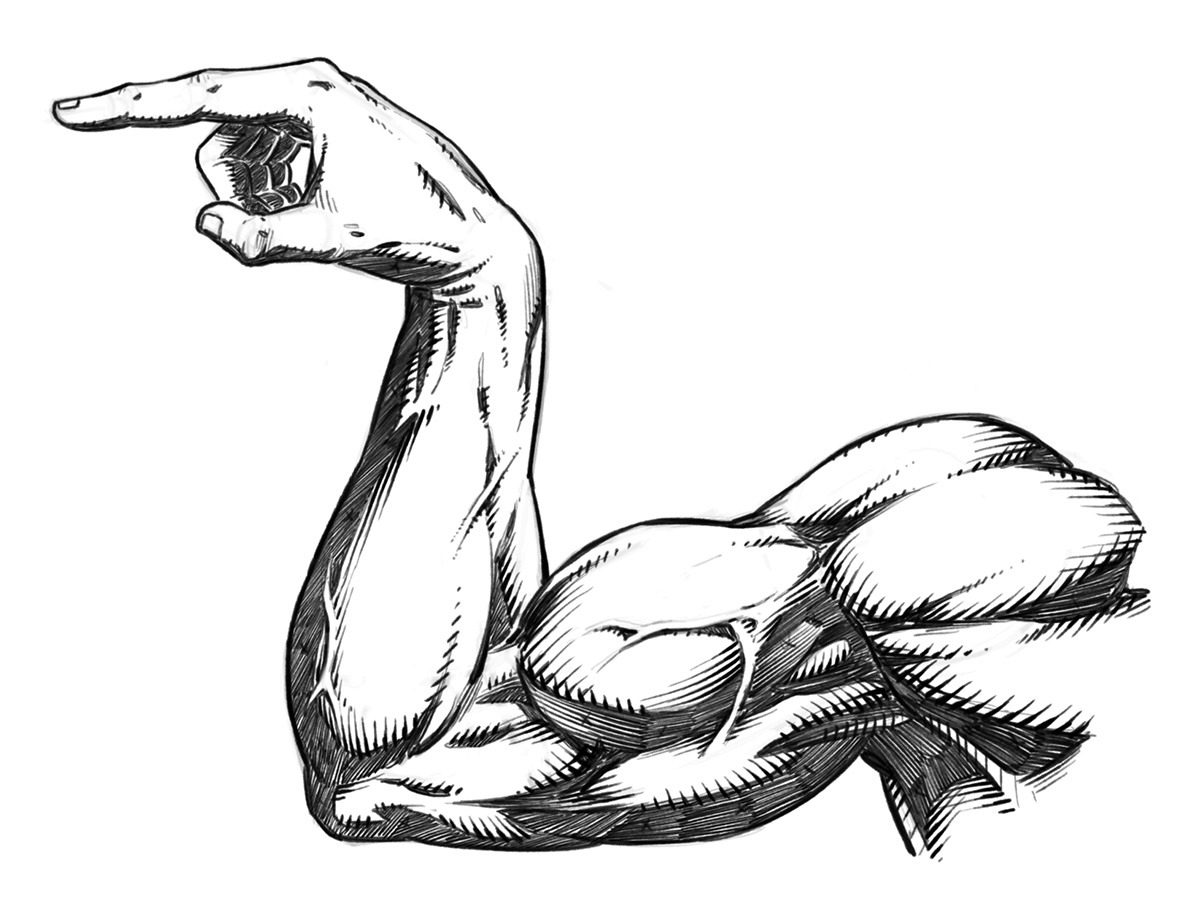
Step 6 – Now add in your rendering lines and really start to make the artwork pop off the page. Notice how the veins cast a small shadow of their own on one side. And, how they catch light on them even in the shadow of the arm. This is more stylized but it gives the appearance of depth. Overall this is a very stylized arm drawing but that is the fun of comics, not everything has to be entirely accurate!

Drawing an Arm Pose – Step 6 – Rendering and Cross Hatching

I hope you’ve enjoy this quick tutorial on stylized arm anatomy for comics. This is a sample tutorial from my book “Learn to Draw Action Heroes” which you can find on Amazon or at Barnes and Nobel.

If you want more educational content like this and prefer video courses you can get them here – https://ram-studios-comics-art-school.teachable.com

Thank you for stopping by and more tutorials are on the way soon.

Keep drawing keep having fun! 🙂

-Robert

Comic Art Review – Livestream – Special Guest David Finch

Art Review Livestream with Special Guest David Finch

Welcome back comic art enthusiasts! We were honored to have the awesomely talented artist David Finch back on our humble little Youtube channel for another Art Review Livestream! As you probably already know, David Finch has worked in the comic industry for over 27 years and is  known for his work on Top Cow Productions’ Cyberforce, as well as numerous subsequent titles for Marvel Comics and DC Comics, such as The New Avengers, Moon Knight, Ultimatum, and Batman.  He has provided album cover art for the band Disturbed, and done concept art for films such as Watchmen.

With such an impressive resume we are very fortunate to have him reviewing the art of our aspiring colleagues. There is something entirely powerful about getting feedback from a pro. It helps us to see things that we otherwise might be struggling to figure out. I truly feel that this is an essential aspect of becoming a better comic book artist and probably the path of least resistance! Well, as long as we are ready to receive the information provided to us of course.

This is the third time David has been on our Youtube channel and each time he has taught us some very useful techniques. Even though this was more for the subscribers of the channel to benefit from you can bet I was taking my own notes! Hey, I’m still learning to you know! 😉

The other nice thing about this process is that David will sometimes stop what he is explaining and start drawing for the student. This is insanely beneficial as you might expect because as artists we are generally visual learners. These interactive sketches just seem to make things click. It is one of the reasons why we do so much better in a studio with other skillful individuals. By watching their approach and being able to ask questions we tend to gain a sense of confidence. Unfortunately, not all of us have that opportunity so these live sessions are the next best thing in my honest opinion.

David Finch explaining some techniques to a student.

If you weren’t able to attend you are welcome to watch the latest episode here –

David is also creating some exceptional course content for us to learn from. You can find his comic art courses here on his site. I have taken a few and they are exceptional and well worth the price!

Check out David’s Courses here on his website – https://davidfinchart.com

You can support his Youtube channel here – https://www.youtube.com/c/DavidFinchartist

Thanks for stopping by and we hope to see you on the next Art Review Livestream. Keep drawing and keep having fun!

Sincerely,

Robert A. Marzullo Ram Studios Comics

How to draw comic style art – from sketch to rendering

How to Draw Comic Style Art – From Sketch to Rendering

Welcome back fellow comic art enthusiasts! I have completed a new series of lessons for you on drawing in a traditional comic art style. From rough sketching to the final rendering and cross hatching stage, you will learn the process I use to create my art with good old pencil and paper.

If you are looking to learn how to draw comics in a step by step fashion then this course is meant for you!

I first walk you through my basic supplies. I show you how I use a variety of pencil leads ranging from 2H to 2B to get the look I am after. This course has multiple projects files so that you can work along with me to better understand drawing with Line, Shape, Form, and Shadow. With these fundamental ideas you can draw anything around you and translate it into your imaginative work of art!

Here are some of the things you can expect to learn in this course –

  • Understanding Line – Shape and Form
  • Constructing Your Designs with Primitive Shapes
  • Working with Light and Shadow
  • Cross hatching or Rendering Techniques
  • Line Weight and Line Clarity
  • Focal Points
  • Contrast within the work
  • And Rendering a Variety of Materials
  • Drawing Dynamic Poses
  • Creating a Superhero Character Design

Get Lifetime access to these video lessons here on my Gumroad – https://gumroad.com/l/PNGi/RAMSTUDIOSCOMICS101

If you prefer to get this course on Udemy then please use this link here – https://www.udemy.com/course/how-to-draw-comic-style-art-from-sketch-to-rendering/?couponCode=RAMSTUDIOSCOMICS111

Once you have purchased this content you get all updates for free. I will be adding more lessons as I learn new techniques to share with you on drawing comic superheroes! Currently this entire course is 6 hours long.

I hope you enjoy the lessons and you can share your artwork with me here through my contact form. Good luck with your comic art and have a great day!

-Rob